

If you run a reusable stainless-steel bioreactor, the rule is simple: CIP removes residue, SIP kills microbes, and you need both in that order.
For bioprocess engineers and cultivated meat teams, that split is not academic. A vessel can pass a final rinse at TOC below 500 ppb and still fail sterility. Or it can hit ≥121.1°C in SIP and still carry leftover NaOH, protein soil, or baked-on residue from poor cleaning. Clean is not the same as sterile.
Here’s the short version:
- CIP uses chemical circulation to remove proteins, lipids, media residue, cell debris, and scale
- SIP uses saturated steam to reach a sterility target, often SAL 10⁻⁶
- CIP must come first because residue can shield microbes from steam
- CIP validation checks residue limits, rinse quality, spray coverage, and repeatability
- SIP validation checks cold spots, F0, and biological indicator kill
- In the article, I also cover cycle steps, common failure points, and a 500 L validation example with TOC at 76–91 ppb and F0 at 32.1 minutes
CIP vs SIP in Pharmaceuticals | Difference, Process, and Key Interview Questions 🧪
sbb-itb-ffee270
Quick Comparison
| Criteria | CIP | SIP |
|---|---|---|
| Main job | Clean product-contact surfaces | Sterilise the closed process path |
| Removes or kills | Residue and soils | Viable microorganisms |
| Typical inputs | NaOH, acid, purified water, WFI | Saturated steam, sterile-filtered air or nitrogen |
| Typical temperature | 50°C–80°C | ≥121.1°C |
| Main checks | TOC, conductivity, visual clean, riboflavin coverage, bioburden | Selecting sensors for temperature mapping, cold spots, biological indicators, F0 |
| Common failure mode | Poor spray coverage, low flow, dead legs | Trapped air, condensate pooling, cold spots |
| When used | Post-harvest, before sterilisation | After CIP, before inoculation |
So if you’re deciding whether CIP or SIP matters more, the answer is straightforward: for reusable aseptic bioreactors, one does not replace the other. Understanding these scaling challenges is critical for maintaining sterility at volume.
CIP vs SIP comparison table
Key differences in purpose, method and validation
CIP and SIP solve two different problems. CIP removes residue. SIP kills microorganisms. In cultivated meat bioreactors, that distinction matters because a vessel can look clean and still fail sterility, or pass a sterility run while still carrying product residue from the last batch.
CIP is validated against residue limits. SIP is validated against sterility targets.
| Feature | Clean-in-Place (CIP) | Sterilise-in-Place (SIP) |
|---|---|---|
| Primary Purpose | Removal of organic and inorganic residues | Elimination of viable microorganisms |
| Target Contaminants | Proteins, lipids, cell debris, media, mineral scale | Bacteria, fungi, spores, viruses |
| Method | Automated chemical circulation with turbulent flow | Injection of saturated steam under pressure |
| Typical Inputs | NaOH (caustic), phosphoric acid, WFI/purified water | Saturated steam; sterile-filtered air or nitrogen |
| Process Temperature Range | 50°C–80°C (typically 65°C for caustic wash) [1] | ≥ 121.1°C [1] |
| Validated outcome | Visually clean; TOC ≤ 500 ppb; conductivity ≤ 1.3 μS/cm [1] | Sterility Assurance Level (SAL) of 10⁻⁶ [1] |
| Batch stage | Immediately post-harvest, before sterilisation | After CIP completion, immediately pre-inoculation |
| Validation Focus | Residue limits (MACO), riboflavin spray coverage, rinse water purity | Thermocouple mapping (cold spots), biological indicators, F0 lethality |
| Cultivated Meat Relevance | Prevents residue carryover and biofilm build-up between batches | Ensures expensive growth media (often requiring serum-free media optimisation) is not lost to contamination |
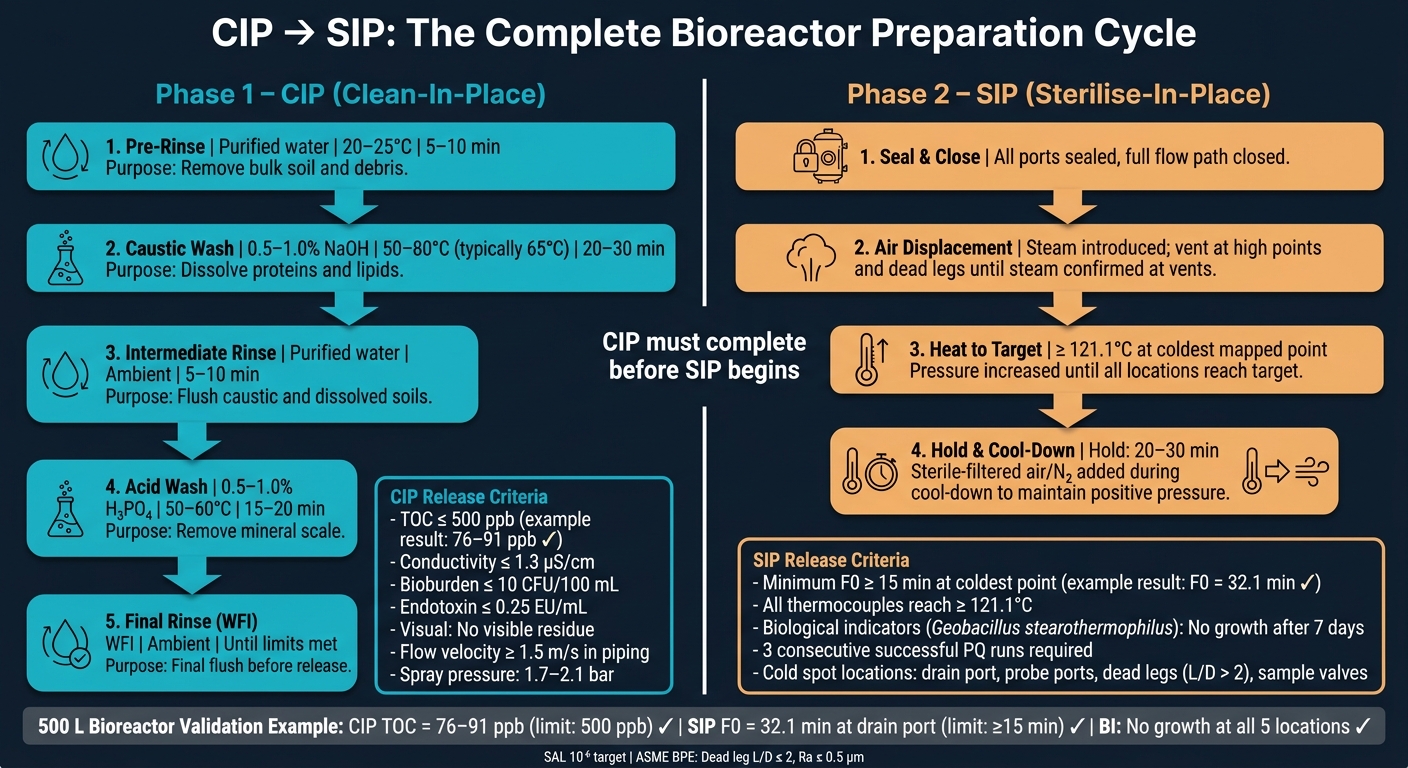
A short validation example makes the split clear. In a validated CIP cycle for a 500 L stainless-steel bioreactor, the final WFI rinse delivered TOC levels of 76–91 ppb, well below the 500 ppb acceptance limit. The SIP cycle that followed reached an F0 of 32.1 minutes at the coldest point, and Geobacillus stearothermophilus biological indicators showed no growth after seven days of incubation [1].
Put simply, CIP validation asks: did every product-contact surface get cleaned? SIP validation asks: did steam reach every cold spot for long enough to deliver lethality?
The next sections break down each cycle and what validation actually checks.
How CIP works in bioreactor cleaning
CIP vs SIP: Bioreactor Cleaning & Sterilisation Workflow
After the comparison overview, the cleaning cycle itself is fairly simple: in cultivated meat bioreactors, CIP removes process soils from product-contact surfaces before sterilisation. It uses staged chemistry because one wash will not remove every soil type.
Typical CIP cycle steps
A standard five-step CIP cycle for a stainless-steel bioreactor proceeds as follows [1]:
| CIP Step | Typical Chemistry | Temperature | Duration | Purpose |
|---|---|---|---|---|
| Pre-rinse | Purified water | 20–25°C | 5–10 min | Remove bulk soil and large debris |
| Caustic wash | 0.5–1.0% NaOH | 50–80°C | 20–30 min | Dissolve proteins and lipids via hydrolysis and saponification |
| Intermediate rinse | Purified water | Ambient | 5–10 min | Flush out caustic cleaning agents and dissolved soils |
| Acid wash | 0.5–1.0% H₃PO₄ | 50–60°C | 15–20 min | Remove mineral scale and inorganic deposits |
| Final rinse | WFI | Ambient | Until TOC and conductivity limits are met | Final flush before release |
The caustic wash does most of the heavy lifting. Sodium hydroxide at 65°C is approximately twice as effective at removing protein soils as the same solution at 40°C [1]. But there is a limit. Above 80°C, proteins can denature and stick to the surface, which makes them harder to remove [1].
Chemistry alone is not enough. Mechanical action matters just as much. In process piping, flow velocity must reach ≥ 1.5 m/s to create the turbulent flow needed to dislodge adherent soils [1]. Inside the vessel, spray devices operate at 1.7–2.1 bar (25–30 psi) to cover the headplate, agitator seals, baffles, and probe housings [1]. Areas behind pH and dissolved oxygen probes are common uncovered areas, where spray coverage can be inconsistent [1].
That point shows up again and again in practice: coverage, not just chemistry, decides whether CIP passes. A 500 L bioreactor study found a shadow zone behind the dissolved oxygen probe. Moving the spray ball by 5 cm closed the gap, and three subsequent PQ runs passed [1].
What CIP validation checks
CIP validation confirms that every product-contact surface has been cleaned to a defined residue limit and that the result can be repeated across batches.
The standard acceptance criteria are:
- Visual inspection: no visible residue
- TOC (rinse water): ≤ 500 ppb [1]
- Conductivity: ≤ 1.3 μS/cm at 25°C [1]
- Bioburden: ≤ 10 CFU/100 mL [1]
- Endotoxin: ≤ 0.25 EU/mL [1]
Riboflavin testing checks spray coverage. A 100–200 ppm solution is circulated and then inspected under UV light at 365 nm to show any areas the spray pattern misses [1]. Geometry also matters at the hardware level. ASME BPE standards require dead leg ratios of L/D ≤ 2 and surface roughness of Ra ≤ 0.5 μm to reduce soil entrapment in piping and fittings [1]. PQ usually requires three consecutive successful runs below the MACO, the carryover limit based on the previous product's HBEL and shared surface area [1]. Once the CIP release criteria are met, the vessel moves to SIP.
How SIP works in bioreactor sterilisation
After validated CIP, SIP sterilises the closed process path with saturated steam. The goal is a Sterility Assurance Level (SAL) of 10⁻⁶. In plain terms, that means less than a one-in-a-million chance that a microorganism survives somewhere in the process path [1][3].
This only works if the system is already clean. Residual soil can shield microbes from steam, which is a common failure mode in practice. And if you put high-temperature steam onto dirty surfaces, you can bake organic matter onto the steel. That can leave behind a stubborn biofilm that is harder to remove in later cleaning cycles [1].
Typical SIP cycle steps
First, all ports are sealed and the full flow path is closed. Steam is then introduced to displace air from the system. That part matters more than it sometimes gets credit for: trapped air creates cold spots, so operators keep venting at high points and dead legs until condensate drains show steam at the vents [1].
Once the air is out, steam pressure is increased until the coldest mapped point reaches at least 121.1°C, which is the standard target for saturated steam sterilisation [1][2]. The system is then held at that temperature for a validated period, often 20 to 30 minutes. During the hold, steam traps remove condensate continuously. If condensate pools, local temperature can drop by 5–15°C, and that may be enough to lose sterility at that spot [1].
Cool-down is controlled, not left to happen on its own. As steam condenses, system pressure falls. To avoid pulling in non-sterile room air, sterile-filtered air or nitrogen is added to keep the system under positive pressure [1].
A good case study comes from a 500 L stainless-steel bioreactor. In that system, a 125°C SIP cycle reached the point where all mapped locations had achieved 121.1°C after 18 minutes. That was followed by a 30-minute hold. The minimum F0 at the coldest point, which was the drain port, was 32.1 minutes. Biological indicators placed at five locations showed no growth after seven days of incubation [1].
What SIP validation checks
SIP validation comes down to one simple question: did every point in the process path receive enough lethal heat?
The main metric is F0, which means the cumulative equivalent minutes of exposure at 121.1°C. The accepted industry target is a minimum F0 of 15 minutes at the coldest point [1][3].
The cold spots drive the risk, so temperature mapping focuses on those areas. Thermocouples are usually placed at condensate drains, probe ports, sample valves, and dead legs with an L/D ratio above 2 [1].
| Location | Risk Level | Typical ΔT from Supply | BI Required? |
|---|---|---|---|
| Drain port / bottom valve | High | 3–8°C | Yes |
| Probe ports (pH, DO) | Medium | 1–4°C | Yes |
| Dead legs (L/D > 2) | High | 5–15°C | Yes |
| Sample valve | Medium | 2–5°C | Yes |
Biological indicators add direct proof of microbial kill. In SIP work, these usually use Geobacillus stearothermophilus spores because they are highly heat resistant. Their D121 value is 1.5 to 2.0 minutes, and validation applies a 12D overkill approach to take a spore population of 10⁶ down to 10⁻⁶ [1].
For performance qualification, the cycle has to pass three consecutive successful runs with biological indicators placed at all mapped locations before it can be released for routine use [1].
SIP is validated through temperature mapping and biological indicators. The next section shows when cultivated meat systems need CIP, SIP or both.
Why both matter for cultivated meat production
In cultivated meat production, contamination is not a minor setback. It is a process failure that can halt a batch outright. One contamination event can wipe out media, product and production time. That’s why CIP and SIP need separate validation.
CIP removes residues. SIP destroys any microorganisms left behind. In reusable stainless-steel bioreactors, those two steps sit on the same release path, but they do different jobs.
Batch consistency depends on both processes being repeatable. If CIP is inconsistent, residue build-up can change from one cycle to the next and alter surface conditions. If SIP is inconsistent, sterility cannot be assured, which increases the risk of contamination getting into the culture.
When a process needs CIP, SIP or both
For reusable stainless-steel bioreactors, both CIP and SIP are needed before each batch. CIP clears residues, then SIP delivers the sterility assurance level of 10⁻⁶ required for aseptic bioprocessing [1][3].
SIP on its own is uncommon. It only fits cases where equipment is already clean but still needs sterilising. CIP on its own works for non-sterile process stages, but it cannot stand in for SIP where sterility is required [3].
Equipment design matters too. ASME BPE guidelines set a dead leg ratio of L/D ≤ 2 and a surface roughness of Ra ≤ 0.5 μm to help cleaning and steam penetration work as intended [1].
Conclusion: cleaning and sterilisation solve different problems
The practical rule is simple: clean first, sterilise second.
CIP and SIP work together, but they are not interchangeable. CIP removes residues to validated chemical and microbiological limits. SIP destroys viable microorganisms to a defined sterility assurance level. In aseptic cultivated meat bioprocessing, both are required, and the order does not change: CIP always comes first [1][3]. A vessel must support both validated CIP and validated SIP.
FAQs
Can SIP replace CIP?
No. SIP cannot replace CIP because the two processes do different jobs, and CIP must come first.
CIP removes physical residues such as growth media and cell debris from bioreactor surfaces. SIP then uses saturated steam to eliminate microorganisms. If CIP is skipped, residues can remain and become baked on during sterilisation, which increases contamination risk.
What does F0 mean in SIP?
In Sterilise-in-Place (SIP) systems, F0 is the total equivalent time, in minutes, at a reference temperature of 121.1 °C.
During validation, engineers use it to check that the coldest point in the bioreactor or piping received enough heat exposure for microbial inactivation.
In cultivated meat production, validation typically calls for an F0 of at least 15 minutes.
Why do cold spots matter?
Cold spots matter because they’re the hardest places to heat during Sterilise-in-Place (SIP). During validation, these points must hold at 121.1 °C for a defined time so all viable micro-organisms are killed.
If a cold spot fails to hit the target temperature, it can harbour contaminants and put an entire cultivated meat batch at risk.


