

If scaffold geometry, ink rheology, and print settings do not match, the print may hold shape but fail in culture - or keep cells alive but lose pore structure.
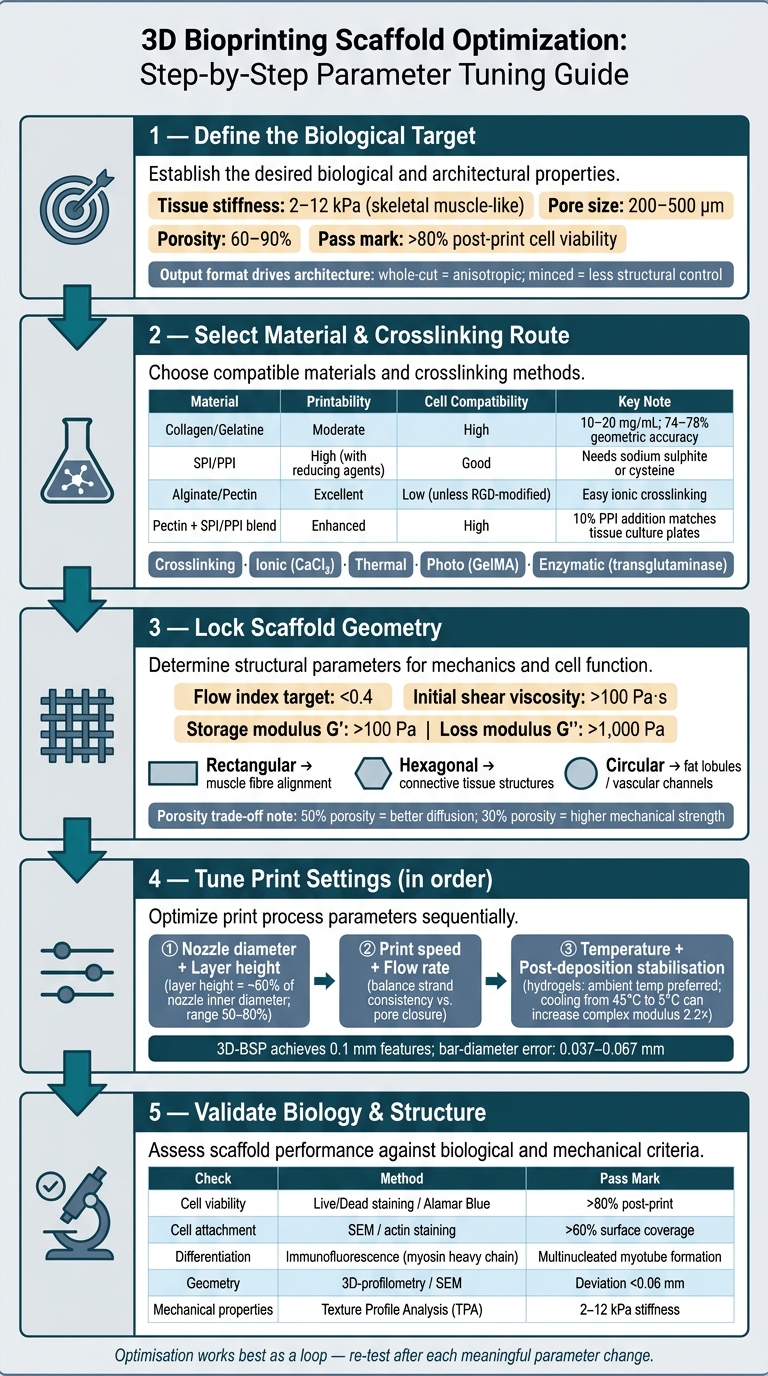
If I had to reduce this topic to one rule, it would be this: set the tissue target first, lock the material and crosslinking route second, and tune nozzle, layer height, speed, and flow only after that. For cultivated meat scaffolds, the article points to a few working ranges that matter straight away: 2–12 kPa stiffness for skeletal muscle-like matrices, 200–500 µm pore size, 60–90% porosity in many designs, and >80% post-print cell viability as a basic pass mark.
Here’s the short version for bioprocess and cell culture teams:
- Start with the product format. Whole-cut structures need anisotropic architecture; minced formats need far less structural control.
- Pick the print method from the material and scale target. Extrusion is common in R&D; 3D bio-screen printing can reach 0.1 mm features and >100 kg/h per machine.
-
Choose materials by both printability and cell response.
- Collagen/gelatine: good cell attachment, weaker shape hold
- SPI/PPI: lower-cost protein route, but flow often needs adjustment
- Alginate/pectin: easy to print, weak cell adhesion unless modified
- Protein–polysaccharide blends: often a better middle ground
- Use rheology as a gate before printing. The article flags flow index <0.4 and initial shear viscosity >100 Pa·s as useful extrusion targets.
- Fix geometry before machine tuning. Pore size, interconnectivity, strand spacing, and lattice pattern drive diffusion, alignment, and scaffold strength.
- Tune settings in order. Nozzle diameter and layer height first, then speed and flow, then temperature and post-deposition stabilisation.
- Validate biology, not just shape. Check viability, attachment, actin coverage, differentiation, pore fidelity, and stiffness after each meaningful change.
One point comes through clearly: there is no single “best” print setting. The right window depends on the scaffold target, the bioink family, and whether you are balancing resolution against shear damage, or porosity against mechanical hold. The rest of the article walks through that sequence in detail so you can tighten the print window without losing cell performance.
3D Bioprinting Scaffold Optimization: Step-by-Step Parameter Tuning Guide
Choosing and Specifying Parameters for Gyroid Infill PCL Scaffolds on Hyrel 3D Printers
sbb-itb-ffee270
Select materials that print accurately and support cell growth
After you’ve picked the printing method, the next step is to narrow the bioink to a material family that can actually run on that platform.
Material choice sets the printer’s operating window. Viscosity affects nozzle flow, thermal behaviour sets the print temperature, and crosslinking determines whether deposited strands stay where they’re placed. Get the material wrong, and you usually lose on both sides: print fidelity drops, and cell viability can drop with it.
Match scaffold materials to printability and edible use
The top biomaterials for cultivated meat scaffolds sit in three main groups: animal-derived proteins, plant-derived proteins, and polysaccharide hydrogels. Each group brings its own trade-off between printability and biological performance.
Animal-derived materials, mainly collagen and gelatine, give strong cell-adhesion cues because they resemble native extracellular matrix. That helps cells attach and behave more naturally. The downside is poor shape retention. Collagen gels are thermally unstable and tend to deform unless used at fairly high concentrations. Collagen bioinks at 10–20 mg/mL can reach geometric printing accuracy of 74–78% [5]. That can work well in R&D, but it leaves less room for more complex architectures. Chemically modified forms such as GelMA improve shape retention through photo-crosslinking, although that adds another layer to the process.
Plant-derived proteins, especially soy protein isolate (SPI) and pea protein isolate (PPI), support lower-cost and more sustainable formulations. But they also thicken fast at higher solids loading, which makes extrusion harder. Food-grade reducing agents such as sodium sulphite or cysteine help keep SPI and PPI flowable at higher protein loads [1]. These inks are best printed at ambient temperature so cells are not exposed to heat during deposition.
Pure polysaccharides such as alginate, pectin, and cellulose derivatives are usually the easiest to extrude. They crosslink fast with calcium ions and hold strand geometry well. The problem is biological rather than mechanical. Unmodified alginate has very few cell-adhesion sites, so cell attachment is poor and spreading can be uneven [2]. That’s why polysaccharides are often blended with plant or animal proteins: the polysaccharide helps the ink print, while the protein helps the cells.
Composite systems can bridge that gap. A good example is pectin combined with SPI or PPI. Adding protein to a pectin gel gives thinner, smoother strands with lower surface roughness than pure polysaccharide gels [3]. A 10% PPI addition to pectin can support cell growth comparable to tissue culture plates [3]. In protein-rich inks, 1% alginate can also act as a binder and improve the stability of multilayer scaffolds, including structures used to mimic fat marbling [1].
| Material Class | Printability | Mechanical Stability | Cell Compatibility | Key Limitation |
|---|---|---|---|---|
| Collagen / Gelatine | Moderate; concentration-dependent | Low without crosslinking | High; strong cell-adhesion cues | Thermal instability; higher cost [5] |
| SPI / PPI | High with reducing agents | Poor alone; needs binders | Good; supports cell growth [1][2] | Often needs rheological modification |
| Alginate / Pectin | Excellent; easy ionic crosslinking | Moderate | Low unless RGD-modified [2][3] | Lacks inherent cell-adhesion sites |
| Pectin + SPI/PPI composite | Enhanced; thinner strands [3] | Robust | High; supports cell growth [3] | More complex ink preparation |
Use rheology and crosslinking to stabilise deposited strands
At base, printability is a rheology problem. The ink needs to shear-thin during extrusion, then recover structure fast once shear stops. That combination is what lets material pass through the nozzle and still hold shape after deposition.
For reliable extrusion, the target is a flow index below 0.4 and an initial shear viscosity above 100 Pa·s [1]. Outside that range, inks are more likely to clog the nozzle or spread after printing. Screen-based printing pushes this even harder. In that case, inks need to tolerate shear rates up to 10,000 s⁻¹ during the squeegee step and then recover viscosity fast enough to avoid strand bleeding [1].
"In order to fully exploit the rheological interactions and ensure efficient material transfer, inks with a high initial shear viscosity (> 100 Pa.s) and strong shear thinning behaviour... are used." - npj Science of Food [1]
Thixotropy matters just as much. If structure recovery is too slow, layers sag and pore geometry starts to collapse. For pectin–protein composite bioinks, a storage modulus (G') above 100 Pa and a loss modulus (G'') above 1,000 Pa are linked with enough structural stability [3].
Crosslinking is what fixes the printed geometry after deposition. It affects strand hold, layer stacking, and pore fidelity directly. The main options are:
- Ionic crosslinking with calcium chloride for alginate- and pectin-based inks
- Thermal crosslinking for thermoplastic systems and collagen
- Photo-crosslinking for modified materials such as GelMA
- Enzymatic crosslinking with transglutaminase, which is gaining traction for protein-based scaffolds as a food-safe option [5][2][4]
The crosslinking route also affects cell viability. Harsh chemical crosslinkers such as glutaraldehyde do not fit cell-laden inks. Where cells are encapsulated in the material, physical and ionic methods are generally preferred.
Once the ink is fixed, geometry and machine settings define what the scaffold can hold.
Define scaffold geometry before fine-tuning machine settings
Once the ink is fixed, define the scaffold geometry before you start tuning nozzle diameter or flow rate. Set the target structure first: pore size, pore shape, strand diameter, total thickness, and how the voids connect across the construct.
Set pore size, porosity and interconnectivity for diffusion and tissue structure
Pore architecture governs nutrient transport, waste clearance, and cell migration. Higher porosity improves diffusion, but it also makes the scaffold weaker [2]. For example, a scaffold at about 50% porosity - common in stencil-based printing - stays open enough for good nutrient flow, but it will be softer than a denser 30% porosity mesh-based equivalent [1]. That trade-off matters. If the goal is fast cell expansion, a more open structure may make sense. If the goal is better mechanical support, a denser network may be the better fit.
Interconnectivity becomes even more important as constructs get thicker. In centimetre-scale tissue blocks, diffusion limits become a major bottleneck, so the internal void network needs to carry media towards the centre [2]. In alginate systems, a secondary crosslinking step such as CaCl₂ followed by EDTA can help build constructs thicker than 0.5 cm while keeping channels open [1].
Pore shape has a direct effect on tissue organisation too. Hexagonal, rectangular, and circular cavities can all support myoblast culture and high shape fidelity [1]. Rectangular channels are useful when you want muscle fibre alignment and bundle formation. Hexagonal patterns fit connective tissue-like structures. Circular cavities can mimic fat lobules or vascular-like channels.
Choose infill and lattice patterns that keep channels open
Lattice pattern helps preserve open channels and sets scaffold anisotropy - the directional bias that steers myoblast alignment into functional myotubes. That matters if you're trying to reproduce the fibrous grain of muscle tissue. The options below are the most practical ones for cultivated meat scaffold fabrication.
| Infill / Geometry Pattern | Connectivity | Mechanical Robustness | Typical use |
|---|---|---|---|
| Hexagonal lattice | High; regular interconnected voids [1] | High stability and shape fidelity [1] | Connective tissue-like structures; structural support [1] |
| Rectangular / grid | High; clear linear channels [1] | Consistent across axes [1] | Muscle fibre alignment and bundle formation [1] |
| Circular cavities | Moderate; dependent on packing density [1] | High compressive strength [1] | Mimicking fat lobules or vascular-like channels [1] |
| Mesh-based (3D-BSP) | Lower (~30% porosity) [1] | Denser network; higher structural rigidity [1] | High-resolution, thin-layer scaffolds [1] |
| Stencil-based (3D-BSP) | Higher (~50% porosity) [1] | More open; similar to cast gels [1] | Marbled fat integration and thicker layers [1] |
3D bio-screen printing (3D-BSP) can keep bar-diameter error within 0.037–0.067 mm and resolve 0.1 mm features [1]. But that level of control depends on setting the target geometry upfront. Once the geometry is locked, you can use it to set nozzle diameter, layer height, and flow in the next step.
Tune core 3D printing parameters step by step
With geometry locked and the ink already characterised, tune the print settings in a clear sequence: nozzle and layer height first, then speed and flow, and temperature last. The point here is simple. These settings should protect the pore architecture you defined earlier, not rewrite it.
Resolution: nozzle diameter and layer height
Nozzle diameter sets the smallest feature size the printer can make with any consistency. In practice, the deposited strand is often wider than the nozzle bore because of die swell. That matters when you're setting wall thickness, strand spacing, and target pore size.
"High resolution depends on narrow nozzles, shear-thinning flow and fast shape recovery." - npj Science of Food [1]
After selecting the nozzle, set layer height to about 60% of the nozzle inner diameter as a starting point. A practical working range is 50–80% [1]. Go too low and the nozzle starts dragging through the layer below. Go too high and interlayer bonding drops off, which can leave internal voids and weaken the structure mechanically. If you see delamination during print trials or handling, reduce layer height in small steps until the layers fuse cleanly.
Once feature size is set, move to deposition behaviour.
Deposition control: print speed and flow rate
Print speed and flow rate need to be tuned together. Too little flow gives you broken or necked strands. Too much flow causes overfilling and pore closure. During extrusion, the material sees high shear, so fast recovery after deposition is critical [1].
Thermal and environmental control for thermoplastics and hydrogels
Temperature control looks very different in thermoplastic and hydrogel systems. For thermoplastics such as polycaprolactone (PCL), nozzle and bed temperatures need tight control to keep the material printable while maintaining mechanical strength [4]. For hydrogels and plant-protein-based inks, ambient conditions are usually preferred because higher temperatures can harm cell viability [1].
Post-deposition cooling can also help stabilise hydrogel scaffolds. In one case, cooling a plant-based fat biomaterial from 45 °C to 5 °C increased its complex modulus 2.2-fold [1]. That becomes important when you're stacking many layers into a thicker construct.
Validate cell compatibility, print quality and sourcing decisions
Check cell viability and reduce shear-related damage
Once you've tuned resolution, speed and flow, the next step is to check the biological result, not just whether the printed shape looks right. Printing adds mechanical stress, and that stress can cut cell viability. In practice, it tends to increase with print speed, applied pressure and nozzle geometry. A narrower nozzle can sharpen resolution, but it also increases shear stress. So every gain in print detail has to be balanced against the biological trade-off.
A sensible baseline is >80% post-print viability. Well-formulated bioinks can reach that level [2]. In a May 2022 Biomaterials study, scaffolds made from pea protein isolate (PPI) and soy protein isolate (SPI) blended with RGD-modified alginate supported bovine satellite cells at 80–90% viability after printing [2]. If your base ink is weakly adhesive, RGD-modified alginate or protein-rich blends can help by adding cell-binding motifs.
"Cell recovery post-printing was observed in two cultivation configurations, reaching ∼80–90% viability over time." - Biomaterials [2]
If viability looks good, don't stop there. Check whether the cells are spreading and organising, not just staying alive. In a June 2026 npj Science of Food study, SPI scaffolds printed by 3D-BSP reached 64% actin coverage and supported myotube formation in C2C12 myoblasts [1]. That's a stronger sign of cell–material interaction than survival alone.
Build a repeatable optimisation workflow for R&D and scale-up
Run the same checks after each meaningful parameter change, not only at the end of a print campaign. That makes it much easier to compare runs and spot where a change helped one output but harmed another.
| Check | Measurement Method | Pass mark |
|---|---|---|
| Cell viability | Live/Dead staining / Alamar Blue | >80% post-print survival [2] |
| Cell attachment | SEM / actin staining | High surface coverage (e.g., >60%) [1] |
| Differentiation | Immunofluorescence (myosin heavy chain) | Multinucleated myotube formation |
| Geometry and microstructure | 3D-profilometry / SEM | Interconnected pores; absolute deviation <0.06 mm [1] |
| Mechanical properties | Texture Profile Analysis (TPA) | Stiffness within the 2–12 kPa range typical of skeletal muscle tissue [4] |
For this kind of work, a Design of Experiments (DoE) approach is usually the fastest route. Vary nozzle size, pressure and flow rate in a structured way, then map where shape fidelity and cell viability overlap. That overlap is your printability window.
Before moving into more complex 3D prints, it's also worth checking cell behaviour on mould-cast versions of the same material. This gives you a cytocompatibility baseline without the added effect of printing-induced shear. If viability drops later during printing, you'll have a much clearer sense of whether the problem comes from the material or the process.
Once you've defined that optimisation window, keep your inputs consistent. For sourcing, Cellbase lists verified suppliers of food-grade biomaterials and bioprinting equipment for cultivated meat.
Conclusion: the parameters that matter most
Reliable scaffold fabrication depends on a clear sequence of decisions. Start with the biological target: tissue stiffness, pore architecture and cell-binding needs. Then work backwards to material choice and print settings. Match the ink's rheology to the printing method before changing nozzle diameter or speed. Fix pore geometry before fine-tuning layer height or flow rate. Then validate against both structural metrics and cell-response data, not geometry alone.
The parameters with the strongest effect on outcome are nozzle diameter for resolution and shear, print speed and flow rate for strand consistency and pore fidelity, and post-deposition stabilisation such as crosslinking or stacking. These factors are linked. Change one, and you can easily disturb the rest. That's why optimisation works best as a loop, with re-testing after each meaningful adjustment, rather than a one-off checklist.
FAQs
How do I choose the right bioink for my scaffold?
Choose a bioink by balancing mechanical performance with biological compatibility. In practice, that means checking rheological properties such as viscosity and shear-thinning behaviour so the material flows under nozzle pressure, then holds its shape after deposition.
Biocompatibility matters just as much. It affects cell attachment, proliferation, and differentiation. Natural polymers such as collagen and gelatin tend to support cells well. By contrast, plant-derived proteins and polysaccharides may need modification to improve cell adhesion.
Use strict quality control throughout, including rheological characterisation at your printing temperatures.
What should I optimise first: geometry, material or print settings?
Start with material characterisation. Rheology, viscosity, and shear-thinning behaviour set the limits on what geometries you can print and which process settings are likely to work.
Once those material properties are clear, calibrate pressure, speed, and nozzle size to hit your target scaffold architecture. If you need help sourcing materials or equipment, Cellbase is a dedicated B2B marketplace for the cultivated meat industry.
How can I improve print fidelity without harming cell viability?
Improving print fidelity without hurting cell viability in cultivated meat production comes down to a trade-off between shear stress and material behaviour. A larger nozzle can cut shear stress and help more cells survive, but it can also reduce print resolution.
If you need higher precision, characterise your bioink’s rheological behaviour at printing temperatures to confirm shear-thinning behaviour.


