

If cell seeding is uneven at the start, perfusion later will not fix it. For bioprocess engineers and cultivated meat R&D teams, the setup has to do four jobs at once: match the chamber to the scaffold, keep the circuit closed and sterile, stage attachment before higher flow, and watch scaffold-level signals such as TMP, flux, pH, and inlet–outlet dissolved oxygen.
I’d boil the article down to this: define the tissue and scaffold first, then build the bioreactor around that target. For constructs thicker than 1 cm, perfusion is needed to keep oxygen and nutrient transport under control. I’d also separate the process into two clear phases: static or very low-flow attachment first, then a logged flow ramp for culture. That one choice can cut early washout and make faults easier to trace later.
If you only need the short version, here it is:
-
Start with the target, not the hardware
Tissue type, species, scaffold porosity, channel layout, and thickness set the limits for chamber design and perfusion path. -
Split the run into two phases
Adhesion first. Then increase flow step by step once anchoring is in place. -
Match perfusion to scaffold geometry
Tube-like scaffolds suit luminal flow. Sheet-like formats may need internal and external flow. Complex 3D forms often need multi-path perfusion. - Pick seeding to fit scaffold openness and cell adhesion Static dwell suits many anchorage-dependent cells. Low-flow perfusion can improve penetration in porous scaffolds, but poor timing can lead to washout.
- Read the scaffold, not just the loop A rising pressure drop, higher TMP, lower flux, or a shift in inlet–outlet DO can point to fouling, blocked channels, or poor oxygen delivery before tissue loss becomes obvious.
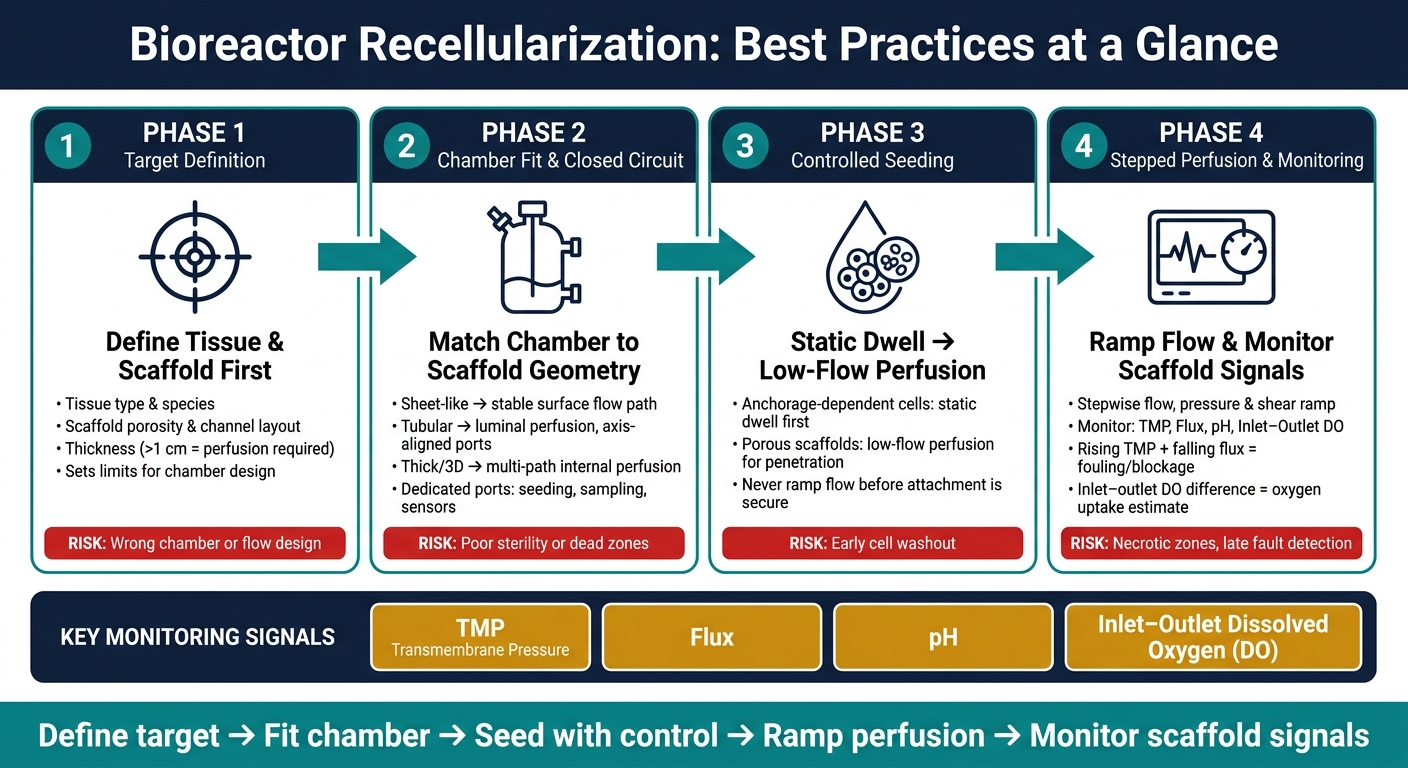
Bioreactor Recellularization: 4-Phase Setup Process for Cultivated Meat
Nonhuman Primate Lung Decellularization & Recellularization l Protocol Preview
Quick comparison
| Area | What I’d focus on | Main risk if missed |
|---|---|---|
| Target definition | Tissue, species, scaffold thickness and porosity | Wrong chamber or flow design |
| Attachment phase | Static or very low flow | Early cell washout |
| Perfusion phase | Stepwise flow, pressure and shear ramp | Detachment, blockage, poor mass transfer |
| Seeding method | Dwell vs low-flow perfusion | Surface-only coverage or low retention |
| Monitoring | TMP, flux, pH, inlet–outlet DO | Late detection of necrotic zones or fouling |
So, rather than treating recellularization as a single culture step, I’d treat it as a sequence: target definition, chamber fit, controlled seeding, stepped perfusion, and scaffold-level monitoring.
1. Select a bioreactor format and build a closed perfusion system
Match the chamber design to scaffold geometry
The chamber choice needs to match the scaffold’s geometry, porosity, and target tissue thickness. That choice affects media delivery, seeding access, and sterile monitoring.
For sheet-like scaffolds, use a chamber that gives you a stable flow path across the scaffold surface. For tubular scaffolds, set the system up to perfuse the lumen directly, with inlet and outlet ports aligned to the tube axis. For thick or organ-shaped scaffolds, use perfusion-based chambers or internal multi-path perfusion so the centre stays supplied and necrotic zones don’t form [1].
The chamber should also have dedicated ports for:
- cell injection during seeding
- media sampling during culture
- sensor probe insertion
If you need optical monitoring, pick chamber and scaffold materials that won’t distort the readout [1].
Chamber geometry also sets the limits on which flow regimes you can use. If the chamber and scaffold are a poor match, your perfusion options narrow fast in the next stage. Once the chamber fits the scaffold, tune flow around the tissue rather than around the hardware.
Build for sterile assembly and mode switching
A closed perfusion system needs a scaffold chamber, pump, media reservoir, gas-exchange unit, and sterile connectors. Assemble the circuit under a laminar flow cabinet, and use sterile connectors to keep the loop closed during operation and mode switching. Modular systems help here because they let you switch between seeding and culture modes without opening the circuit.
How Cellbase supports equipment sourcing
Cellbase helps teams source scaffold chambers, pumps, sterile connectors, and monitoring sensors for cultivated meat, with filters for scaffold compatibility and GMP compliance. That gives procurement a clear way to align the circuit with the recellularization target from the start.
sbb-itb-ffee270
2. Set flow dynamics for uniform seeding and viable tissue growth
Ramp up flow rate, pressure and shear in steps
Once the chamber is assembled and the scaffold is in place, don’t start at full culture flow. Begin with the lowest flow that still maintains perfusion, then increase it in controlled steps. That gives cells time to attach and spread before they see more shear.
If flow is too low, nutrient delivery to the scaffold core drops off. If it is too high, cells can detach before they form stable contacts.
Track transmembrane pressure (TMP) and flux at each step. A rise in TMP alongside a drop in flux points to fouling or blockage [1].
Once you’ve set the ramp, the next job is to align the perfusion path with the scaffold geometry.
Choose luminal, external or multi-path perfusion to match scaffold architecture
The same principle applies when picking the perfusion path. Use luminal perfusion for tube-like scaffolds, combined internal and external flow for sheet-like designs, and multi-path perfusion for complex 3D scaffolds where dead zones are more likely.
Flow regime comparison table
| Flow Regime | Operating Purpose | Typical Control Variables | Expected Effect on Cell Retention | Mass Transfer Performance | Main Failure Risks |
|---|---|---|---|---|---|
| Low-shear seeding perfusion | Initial cell attachment and even distribution | Low flow rate, minimal shear stress | High - allows cells to anchor before shear increases | Limited; relies on proximity to flow path | Cell settling; uneven coverage; cell loss from poor attachment |
| Higher-flow culture perfusion | Long-term growth and high-density maintenance | Ramped flow rate, stable TMP, flux | Lower - focus shifts to mass transfer efficiency | High - required to reach central scaffold regions | Channel blockage; necrotic zones; shear-induced cell damage |
Treat the shift from seeding flow to culture flow as a logged ramp, not a simple switch. That makes the process easier to repeat and gives you a clear basis for tuning later runs. With flow stabilised, choose the seeding method that gives the best coverage and cell retention.
3. Apply cell seeding methods that improve coverage and retention
Use static dwell seeding or low-flow perfusion for initial attachment
Start with static dwell or very low flow to secure initial attachment. Anchorage-dependent cells need a dwell phase before you move into perfusion. If you shift them into suspension too early, growth can drop. And if attachment is weak, use the mildest medium that still keeps cells viable during the dwell period.
Once attachment is in place, pick the seeding route that gives you the best coverage with the least washout.
Compare static dwell seeding and low-flow perfusion seeding methods
Match the method to scaffold openness and the level of cell retention you need. Static dwell seeding is simpler and works well for cells that need time on the surface before flow starts. Low-flow perfusion seeding is better when the scaffold needs active cell movement through the structure rather than passive settling.
For porous scaffolds, the goal is to move cells into the scaffold, not leave most of them on the outer surface. But there’s a catch: if you switch to perfusion too soon, washout is more likely before attachment is established [2].
So the choice should follow three things:
- scaffold openness
- cell adhesion strength
- how evenly cells need to spread
Seeding method comparison table
| Seeding Method | Best Use | Main Risk |
|---|---|---|
| Static dwell seeding | Anchorage-dependent cells; scaffolds where dwell time improves retention | Uneven distribution in dense or complex scaffold structures |
| Low-flow perfusion | Porous scaffolds requiring active cell distribution across the structure | Washout if flow is not ramped carefully before attachment is established |
The next step is to verify coverage, retention, and early washout before increasing flow.
4. Monitor the process and troubleshoot recellularization performance
Place sensors where they reflect actual scaffold conditions
Once perfusion is running, monitor the scaffold itself, not just the bulk loop. In practice, that means comparing inlet and outlet readings at the chamber.
The inlet–outlet DO difference shows oxygen uptake inside the scaffold. Use that difference to estimate oxygen uptake within the construct, and place sampling ports at the chamber so you don't end up chasing tubing artefacts. Read TMP, flux and DO together, and line them up with the same logged flow steps used during seeding and culture ramps.
Optical monitoring can misread scaffold conditions. Light scattering and refractive index mismatch can distort the signal, especially in thicker or optically complex materials. Validate optical sensors against the scaffold material before you depend on them.
If those readings start to drift, treat the pattern as a process fault, not a one-off sensor problem.
Troubleshoot uneven distribution, necrotic zones and blocked channels
These signals help you tell the difference between poor seeding and restricted perfusion.
Uneven cell distribution usually means the seeding route did not match the scaffold architecture, or flow was ramped up before attachment was secure. Necrotic zones usually point to poor oxygen delivery. That can happen when the perfusion rate is too low, media exchange is too infrequent, or a blocked channel cuts off part of the scaffold.
If flux drops while TMP rises, inspect the scaffold, tubing and ports for fouling or blockage before changing the flow programme.
For blocked channels, run a pressure-drop check across the scaffold before and during the process. If pressure drop rises at a constant flow rate, patency is being lost. That's a strong warning sign and worth acting on early.
The table below maps common failure modes to likely causes and corrections:
| Failure Mode | Likely Cause | Correction |
|---|---|---|
| Uneven cell distribution | Seeding route mismatched to scaffold; flow started too early | Revise seeding method; extend dwell phase before perfusion |
| Necrotic zones | Insufficient oxygen delivery; blocked channels | Increase perfusion rate gradually; check scaffold patency |
| Rising TMP, falling flux | Scaffold, tubing or port fouling or blockage | Inspect scaffold and ports; review exchange frequency and cleaning sequence |
| pH drift | Waste accumulation; inadequate media exchange | Increase exchange frequency; validate sampling port placement |
Conclusion: Standardise what works and refine the setup over time
Standardise the signals that matter: inlet–outlet oxygen, TMP, flux, pH and sampling data. Then use each run to tighten alarm thresholds and adjust perfusion ramps.
For teams sourcing chamber-compatible sensors and perfusion hardware, Cellbase connects cultivated meat buyers with verified suppliers.
FAQs
How do I choose the right bioreactor for my scaffold?
Choose a bioreactor that fits your scaffold technology and your cultivation goals. The system needs to support the scaffold’s physical structure, including its porosity and mechanical strength, while also maintaining flow conditions that suit cell adhesion and nutrient transport.
It’s also worth looking at how well the bioreactor supports scale-up for tissue formation and whether it matches your cell-seeding method. Cellbase can help you assess specialised bioreactor infrastructure for cultivated meat production.
When should perfusion start after seeding?
Perfusion should usually start once cells have attached and begun to settle on the scaffold. If flow starts too soon, it can disturb seeding and weaken attachment. Leave it too late, and you risk nutrient depletion or a build-up of metabolic waste inside the tissue construct.
In practice, the switch point is often guided by metabolic activity and oxygen consumption. Those signals give you a clearer read on when the construct is ready for perfusion without adding avoidable stress to the culture.
Which signals best show scaffold perfusion problems early?
Early signs of perfusion problems in scaffold-based cultivated meat production usually show up in metabolic by-products and nutrient uptake.
In perfused systems, unexpected glucose consumption or a spike in lactate production usually points to scaffold architecture that is limiting mass transport.


