

If I cannot see through the scaffold, I cannot trust the readout. In cultivated meat, optical monitoring often fails for two simple reasons: light scattering and refractive index mismatch. As constructs move from thin layers to 1–10 mm 3D tissues, those limits cut image depth, blur internal structure, and hide changes in viability, alignment, and ECM build-up.
Here’s the short version:
- Thin, clear scaffolds are the easiest to image with widefield or confocal microscopy
- Thicker 3D constructs usually need OCT, OCM, or OPT
- Hydrogels tend to support better optical access than fibrous mats or porous polymer supports
- Cell density, swelling, and matrix deposition often make imaging worse over time
- A setup that works on day 1 may fail at culture end-point if you do not check transmission and depth at maturity
- Imaging must still work inside closed, sterile, incubator-compatible systems
If I were choosing a scaffold for in-process monitoring, I would start with one question: how much usable signal will still get through at the final tissue thickness? That one check helps narrow both the scaffold class and the imaging method before scale-up.
Quick comparison
| Scaffold or method | Best fit | Main limit |
|---|---|---|
| Clear hydrogel + confocal | Thin constructs, high-detail surface and near-surface imaging | Depth drops fast as thickness and scattering increase |
| Hydrogel + OPT | Transparent 3D constructs, about 1–10 mm | Lower fine detail, more data handling |
| Semi-transparent scaffold + OCT/OCM | Repeated non-destructive tracking in 1–5 mm tissues | Signal still depends on low-to-moderate scattering |
| Fibrous or porous scaffold + OCM | Surface and near-surface mapping in denser materials | Core imaging stays limited |
| Collagen-rich matrix + SHG | Label-free collagen structure and alignment | Only useful for specific matrix signals |
So the main point is simple: scaffold design and imaging choice have to be selected together, not one after the other.
The main optical transparency problems in scaffold materials
Scaffolds get in the way of optical monitoring for two main reasons: scattering and refractive index mismatch. Both become more of a problem as constructs get thicker. That makes attachment, alignment, viability and matrix deposition much harder to follow in real time.
Scattering and refractive index mismatch
Light scattering happens when light hits pores, fibres or particles that are similar in size to the wavelength in use. Each of those features creates an interface that knocks light off course. The result is lower contrast and a distorted signal at the detector.
Refractive index (RI) mismatch adds another layer of trouble. If the scaffold material does not closely match the surrounding aqueous medium, light bends at each interface. That leads to optical aberrations, lower resolution and shallower imaging depth.
How scaffold type changes the monitoring challenge
These limits look very different depending on scaffold class.
| Scaffold class | Main optical limitation | Impact on monitoring |
|---|---|---|
| Hydrogel | RI shift from swelling; turbidity at higher cell densities | Imaging becomes harder as culture matures |
| Electrospun fibrous mat | Dense fibrous scaffolds scatter strongly; extracellular matrix deposition increases opacity | Contrast loss; imaging is most reliable near the surface |
| Thin film | Low scattering, but limited 3D relevance | Easier optical monitoring; limited 3D tissue structure |
| Porous polymer scaffold | Pore-wall interfaces and trapped particles scatter light strongly | Standard microscopy struggles |
In practice, this means material choice cannot focus on structure alone. The scaffold also needs to limit light loss if you want usable in-process imaging.
Where standard microscopy falls short
Widefield and confocal microscopy mostly pick up near-surface signals, so they miss what is happening in the core of millimetre-scale constructs. That leaves cell viability, alignment and extracellular matrix deposition in the interior partly seen or completely hidden. For teams moving from thin screening models to thicker tissues, this becomes a direct process constraint.
Monitoring plans need to shift before scale-up starts. Scaffold choice has to account for transparency alongside cell support.
Material choices that improve transparency without losing scaffold function
The previous section showed that scaffold type sets the point where optical monitoring starts to fail. The next step is material selection: how do you cut optical losses without giving up the structure and cell-facing cues that muscle and fat cells need?
Index-matched hydrogels and polymer substrates
When optical clarity matters more than mechanical strength, hydrogels are usually the easiest materials to work with. Their high water content can bring the refractive index close to 1.33, which reduces distortion at material boundaries and supports 3D muscle and fat tissue growth. In practice, that means the material itself often sets the upper limit on what the imaging system can resolve.
Transparent polymer films can also give high optical transmission, but they usually sit at a higher refractive index than water. Because of that, they tend to work best when they are kept thin, where index mismatch has less impact. That makes them a better fit for adherent cell layers and 2D-to-3D assembly formats than for thicker 3D tissue constructs.
Sterilisation method matters too. Heat-sensitive hydrogels and films may need non-thermal sterilisation, and that can change both handling and optical clarity.
Transparent films, porous supports and functionalised hydrogels
Once the optical limits are understood, scaffold choice becomes a balancing act between clarity, mass transport and differentiation control.
Porous supports are useful for 3D growth and nutrient flow, but scattering usually limits what standard optical methods can do. In most cases, that pushes monitoring towards OCT, OCM or OPT.
Functionalised hydrogels sit in a useful middle ground. They can provide tunable adhesion and directed differentiation while still keeping high transparency. Their refractive index can also be matched to the culture medium, which makes them a good option when both cell performance and imaging quality matter.
Comparing scaffold options for monitoring use
| Scaffold strategy | Optical transmission | RI behaviour | Best imaging methods | Culture suitability |
|---|---|---|---|---|
| Index-matched hydrogels | High | Water-matched (~1.33); reduces distortion in thick regions | Confocal, OCT, OCM | 3D muscle/fat tissue growth |
| Transparent polymer films | High | Higher RI than water (~1.5+); requires thin layers to minimise mismatch | Widefield, phase contrast | Adherent cell layers; 2D-to-3D assembly |
| Porous supports | Moderate to low | High scattering due to pore-media RI mismatch | OCT, OCM, OPT | High-density 3D growth; nutrient flux |
| Functionalised hydrogels | High | Tunable; can be matched to media | Confocal, fluorescence | Targeted adhesion and directed differentiation |
No single scaffold strategy works best in every case.
- Use hydrogels when clarity is the main concern.
- Use films for thin adherent layers.
- Use porous supports when transport matters more than imaging ease.
- Use functionalised hydrogels when adhesion control comes first.
Those trade-offs decide which imaging method can still return usable data through the scaffold.
sbb-itb-ffee270
Matching imaging methods to scaffold transparency limits
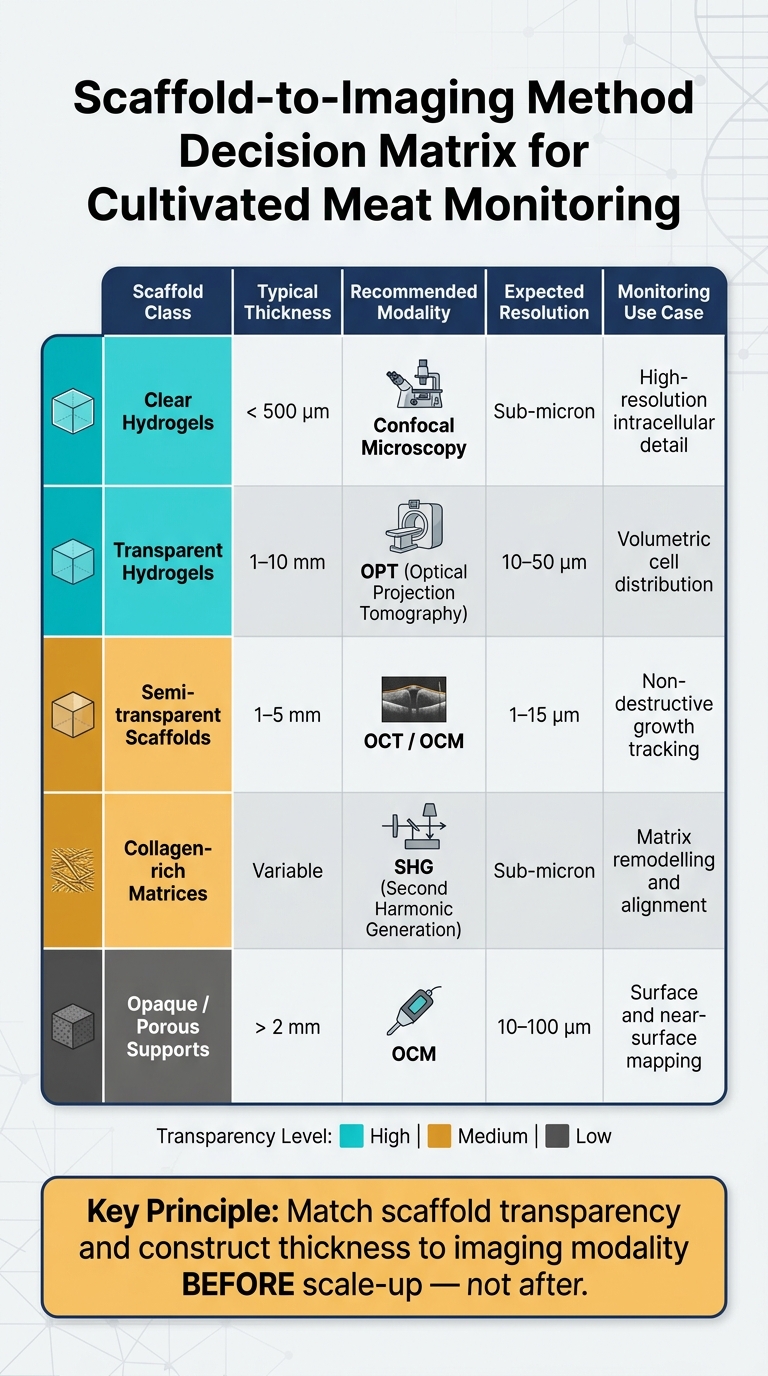
Scaffold-to-Imaging Method Decision Matrix for Cultivated Meat Monitoring
Once you know which scaffolds stay transparent, the next job is picking the imaging method that can actually see through them. Scaffold clarity, construct thickness and the readout needed - surface detail, volumetric mapping or repeated label-free data - quickly narrow the list.
Where confocal, OCT, OCM, OPT and nonlinear imaging each work best
Confocal microscopy is the best starting point for thin, clear scaffolds under 500 µm. In clear hydrogels, it can deliver sub-micron detail. The trade-off is depth. As thickness goes up, scattering starts to wreck image quality, so confocal stops being practical for thicker constructs.
For constructs in the 1–5 mm range, optical coherence tomography (OCT) and optical coherence microscopy (OCM) cope with scattering much better than confocal. OCT is especially useful for routine process monitoring because its faster scan speed makes repeated checks during culture more practical. OCM fits cases where you need a higher-resolution look at near-surface organisation, usually in the 1–15 µm range. For opaque or porous supports thicker than 2 mm, OCM is usually the practical option for surface and near-surface mapping.
Optical projection tomography (OPT) works well for transparent hydrogels in the 1–10 mm range and gives 10–50 µm volumetric data. That makes it useful for following cell distribution across the full construct, rather than trying to resolve fine intracellular structure. In collagen-rich matrices, second harmonic generation (SHG) can visualise fibrillar collagen without fluorescent labels. That is useful when you want to follow matrix remodelling and structural alignment.
How to build a non-destructive monitoring workflow
Keep samples in culture wherever possible. Every transfer adds contamination risk and exposes the construct to shifts in temperature, gas balance and handling stress. Incubator-integrated imaging helps keep monitoring non-destructive [1].
Repeated sampling undercuts one of the main advantages of transparent scaffolds. Label-free imaging lets you track change without disturbing culture conditions. In practice, OCT, OCM and SHG are better suited to repeated measurements because they avoid the phototoxicity linked to fluorescent dyes and high-intensity laser exposure. For routine process monitoring, it usually makes more sense to favour faster scanning modalities over the highest possible resolution. In pilot work, throughput often matters more than ultra-fine detail.
Scaffold-to-imaging decision matrix
Use the matrix below to choose the least invasive method that still gives usable data.
| Scaffold class | Typical thickness | Recommended modality | Expected resolution | Monitoring use case |
|---|---|---|---|---|
| Clear hydrogels | < 500 µm | Confocal microscopy | Sub-micron | High-resolution intracellular detail |
| Transparent hydrogels | 1–10 mm | OPT | 10–50 µm | Volumetric cell distribution |
| Semi-transparent scaffolds | 1–5 mm | OCT / OCM | 1–15 µm | Non-destructive growth tracking |
| Collagen-rich matrices | Variable | SHG (nonlinear) | Sub-micron | Matrix remodelling and alignment |
| Opaque / porous supports | > 2 mm | OCM | 10–100 µm | Surface and near-surface mapping |
Matching the imaging method to scaffold transparency and thickness at the start helps avoid a common mid-experiment problem: finding out too late that the chosen system cannot return usable data through the construct.
Implementation priorities for cultivated meat teams
Validation checks before scale-up
Once the imaging method matches the scaffold, the next job is to show that the setup still performs during culture. A scaffold–imaging pairing that looks fine on day one can fall apart as the construct thickens and cell density climbs.
Before locking in a scaffold and monitoring workflow for scale-up, teams should check transmission stability across the full culture period and confirm imaging depth at maturity, when the construct is at its densest. They should also verify bioreactor and media compatibility, because vessel geometry and media refractive index can affect signal quality. If the goal is broader reliability, it also helps to test across cell types and culture stages to confirm the setup stays consistent as conditions shift, and to check that data processing reduces batch effects [2].
Running these checks at pilot scale before moving to larger constructs can catch incompatibilities early and help avoid late-stage redesigns.
Sourcing scaffold and monitoring components through Cellbase
After validation, the next step is sourcing components that fit the chosen monitoring workflow. Cellbase is a B2B marketplace for cultivated meat teams to source verified scaffolds, sensors, bioreactors and related equipment. Listings include use-case tags to speed component selection.
Conclusion: the practical route to better monitoring accuracy
Reliable monitoring workflows need validation across the full culture period. Transmission stability, imaging depth at maturity, and bioreactor and media compatibility all need to be confirmed before scale-up to maintain monitoring accuracy as culture conditions change [2].
FAQs
Why does imaging fail as 3D tissues get thicker?
As 3D tissues get thicker, imaging gets harder. The main reason is simple: in vitro cultivated meat structures do not have vasculature. In living systems, vascular networks transport oxygen and nutrients in, and carry waste out, across much larger distances.
Without those transport pathways, the deeper parts of the tissue are harder to keep viable and harder to observe. That loss of tissue health also reduces the optical transparency needed for accurate, real-time imaging.
How do I choose the right imaging method for my scaffold?
Start by making sure the scaffold matches what your cells need biologically, especially native muscle stiffness, adhesion chemistry, and pore architecture.
The scaffold also shapes how well you can monitor the system. So pick a material that holds its structural integrity and optical clarity under your test conditions. Cellbase can help you find verified suppliers of specialised scaffolds and sensors for cultivated meat production.
What should I validate before scaling up optical monitoring?
Before you scale up optical monitoring, make sure your cell lines are stable and reliable over many passages. They need to stay genetically and phenotypically consistent, or your readouts can drift and become hard to trust.
It’s also worth checking that scaffold transparency allows accurate monitoring without interfering with tissue development. A scaffold may look suitable on paper, but if it scatters light, autofluoresces, or changes how the tissue forms, your sensor data can become misleading.
Your bioreactor setup also needs to work with the sensor systems you plan to use. That includes physical integration, optical access, sterilisation constraints, and signal compatibility. Cellbase can help you source relevant sensors, scaffolds and bioreactors.


