

If a knockout does not improve a defined process trait, it is just an edit, not a usable cell line.
For bioprocess engineers, cell culture scientists, and cultivated meat R&D teams, the article’s main point is simple: I start with the bottleneck, set pass/fail thresholds before editing, then build the workflow around a measurable production readout such as lower doubling time, suspension growth, or removal of a surface antigen. The article also makes clear that pool-level editing data are useful for guide ranking, but a release-grade knockout needs clone-level genotype, protein-loss data, lineage checks, and multi-passage process testing (often involving primary vs immortalised cell lines).
A July 2024 case from Ivy Farm linked NF2 knockout in porcine and bovine myoblasts and adipose-derived stem cells with shorter doubling times, support for suspension culture, and retention of lineage markers. But the article does not treat that as universal. I still need species-, lineage-, and target-specific validation before moving any edited clone forward.
What the article says to do:
- Define the edit goal in process terms, not cost terms
- Set thresholds up front for growth, suspension fitness, marker retention, and passage stability
- Pick the target gene only after checking pathway role, lineage effect, and safety-linked risks
- Design guides against constitutive coding exons and check the parental locus by PCR and Sanger first
- Use donor-free workflows with RNP delivery where possible to limit editor exposure time
- Treat bulk pools as an early screen, not proof of knockout
- Confirm biallelic loss, then check protein absence
- Validate the clone against matched parental or Cas9-only, no-sgRNA controls
- Release only lines that pass four layers: edit identity, molecular consequence, cell function, and production fitness
A few technical points stand out. The article notes that wild-type SpCas9 can tolerate 3 to 5 mismatches, which is why off-target review cannot be an afterthought. It also points out that 17 to 18 bp truncated guides can cut off-target activity by as much as 500-fold with little drop in on-target performance. And because donor-free repair often gives mixed indels, I cannot assume that “edited” means “null” - in-frame alleles may still keep function.
Where I found the piece most useful is its discipline: genotype alone is not enough, fast growth alone is not enough, and suspension data from one passage are not enough. A knockout line only matters if it keeps lineage identity, stays stable over at least four passages in triplicate, and still performs under the same culture format and density it will face in production.
That is the frame for the rest of the article: move from bottleneck, to edit design, to clone screen, to release decision without mixing those steps together.
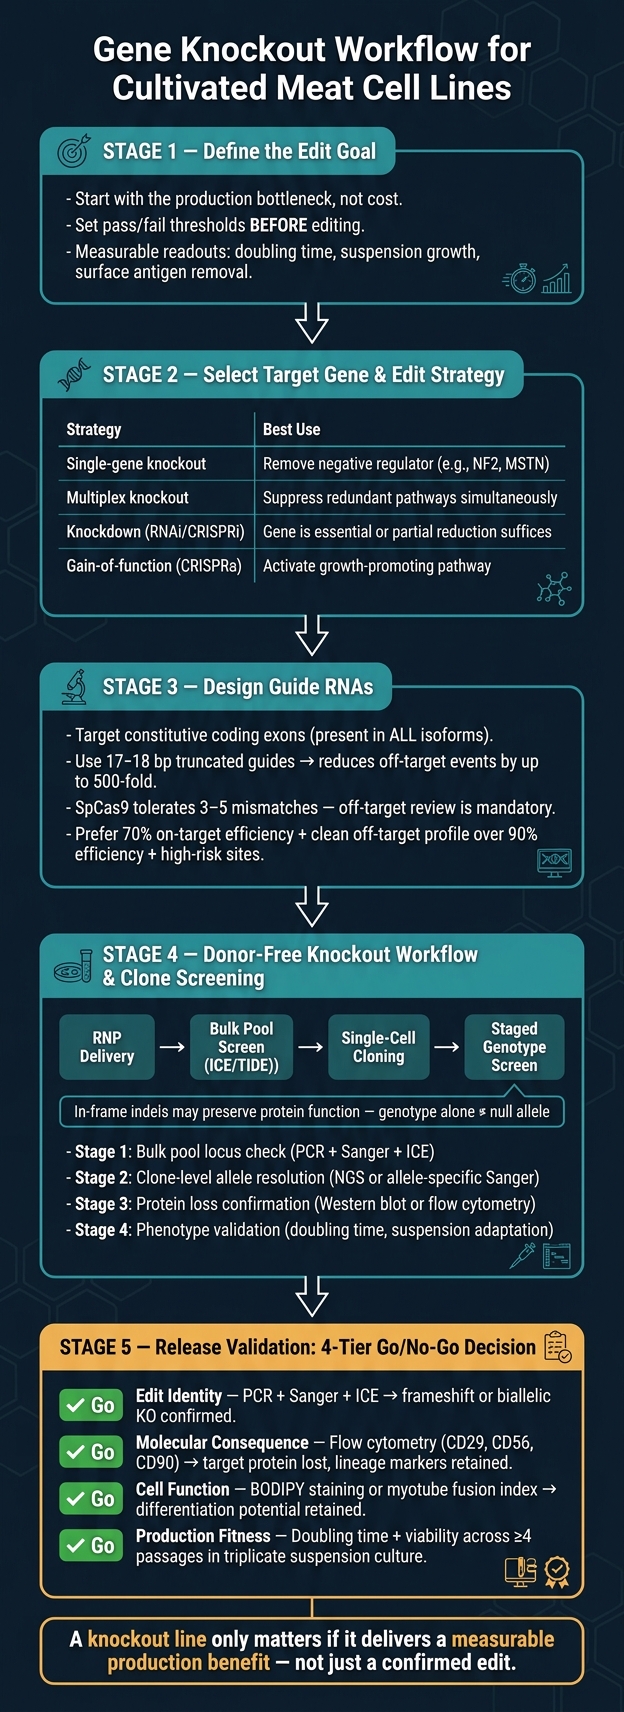
Gene Knockout Workflow for Cultivated Meat Cell Lines
Select the target gene and choose the right edit strategy
Map the trait to a targetable pathway or regulatory node
Once the edit goal is clear, the next step is to trace the production bottleneck back to a specific regulatory node. Slow doubling time or weak suspension growth often maps to a defined pathway node, presenting significant challenges to scaling cultivated meat, such as Hippo, RAS, WNT/β-catenin or NOTCH [1].
That sounds simple on paper. In practice, it rarely is. A gene that supports growth in one setting may be required for survival or differentiation in another. Before you commit to a target, check the evidence in the species and cell type you care about. Look at whether the gene’s function is redundant or non-redundant, and confirm that loss of function will not damage myogenic or adipogenic potential, genomic stability, or any safety-linked feature of the final product [1].
Assess candidate targets without assuming any gene is universally suitable
NF2 - which encodes the Merlin protein - is a good example of a knockout target in cultivated meat research. Ivy Farm Technologies showed that NF2 knockout reduced doubling time and supported suspension adaptation in porcine and bovine lines while preserving lineage markers [1]. Because NF2 sits across Hippo, RAS, WNT/β-catenin and NOTCH signalling, one knockout can shift several growth pathways at once without multiplex editing [1].
MSTN (myostatin) is another target that comes up often, especially when the aim is to improve muscle cell yield. Cell-cycle regulators such as RB1 and TP53 also appear in multiplex strategies built to extend proliferative capacity. But there’s no such thing as a universal target. A gene that works in one species or cell type still needs separate validation in another. The same edit can give a different phenotype, or bring instability with it. If you don’t have data in the lineage in front of you, don’t assume the result will transfer [1].
Compare knockout with knockdown, multiplex editing and gain-of-function approaches
| Edit Strategy | When to Use | Main Limitation | Evidence Required |
|---|---|---|---|
| Single-gene knockout | To permanently remove a negative regulator (e.g., NF2, MSTN) that directly restricts growth or suspension adaptation [1] | Potential for irreversible loss of essential secondary functions | Confirmation of non-essentiality for viability and differentiation in the target lineage [1] |
| Multiplex knockout | When redundant pathways must be suppressed simultaneously (e.g., RB1, TP53, and RAS combinations) [1] | Increased risk of genomic instability and cumulative off-target effects [1] | Synergistic effect data and rigorous off-target screening across all edited loci [1] |
| Knockdown (RNAi/siRNA/CRISPRi) | When a gene is essential or partial reduction is enough to reach the trait [1] | Often transient; requires continuous delivery or stable shRNA integration | Dose-response data showing partial reduction achieves the target phenotype [1] |
| Gain-of-function (CRISPRa or knock-in) | To activate a growth-promoting pathway or add a new capability [1] | Complex insertion workflows; risk of oncogenic transformation or metabolic burden [1] | Verification that increased expression does not inhibit differentiation potential [1] |
Use this comparison to settle the edit strategy before guide design starts. If the gene is essential, or if the change you need is a matter of degree rather than full removal, knockdown or CRISPRi gives tighter control. Multiplex editing makes sense only when single-gene data show that the added complexity is worth it [1][2].
Once the edit class is fixed, design guide RNAs for complete loss of function.
sbb-itb-ffee270
Design guide RNAs for true loss of gene activity
Confirm the reference sequence, transcript structure and variant profile
Start with the gene model, not the guide sequence. Guide design should begin only after you’ve finished target selection and confirmed the parental-line sequence.
Use the correct species-specific reference genome. Then map the full transcript structure: exon boundaries, coding sequence start and stop, and all annotated isoforms. After that, verify the parental line itself. If a guide misses a constitutive exon, a functional isoform may still survive.
PCR-amplify the parental locus, Sanger-sequence the amplicon, and compare sequence calls across passages to confirm the starting sequence. Use ICE to flag pre-existing variants or polymorphisms. Once the starting locus is locked down, rank guides by frameshift likelihood and off-target profile.
Rank guide sites for frameshift likelihood and low off-target risk
After confirming the gene model, focus guide selection on constitutive coding exons. These are the exons present in every annotated isoform, so edits there are more likely to disrupt all relevant transcripts.
Off-target risk matters just as much. Wild-type SpCas9 can tolerate three to five mismatches, especially at PAM-distal positions. So a guide with a strong predicted on-target score can still produce unintended cuts, especially after clonal expansion.
One simple way to reduce that risk is to trim the guide to 17–18 bp. This can cut off-target editing events by up to 500-fold with little loss of on-target accuracy [2]. In practice, a guide with 70% on-target efficiency and a clean off-target profile is usually a better starting point than one with 90% efficiency and several high-risk predicted sites.
That ranking should feed straight into the nuclease choice below.
Choose the editing system that fits the knockout objective
The editing system shapes guide design as much as the target gene does. For donor-free knockout work in cultivated meat cell lines, the main options are below.
| Editing System | DSB Required | Typical Knockout Mechanism | Guide Design Implications | Best use |
|---|---|---|---|---|
| SpCas9 Nuclease | Yes | Frameshift indels via NHEJ | 20 bp guide + NGG PAM; high off-target risk | Standard knockout in robust primary or immortalised lines |
| Hi-Fi Cas9 Variants | Yes | Frameshift indels via NHEJ | 20 bp guide + NGG PAM; narrower off-target risk | When off-target risk is elevated |
| Cas12a (Cpf1) | Yes | Frameshift indels via NHEJ | T-rich PAM such as TTTN; creates staggered cuts | AT-rich loci or multiplexed knockout of several targets |
For many donor-free knockout jobs in cultivated meat cell lines, SpCas9 nuclease with a 17–18 bp truncated guide is a solid starting point. High-fidelity variants make sense when the off-target landscape is crowded. Cas12a is a good fit when the locus is AT-rich or when one transfection needs to disrupt several genes at once.
The main point is simple: match the system to the objective instead of defaulting to the platform you use most often. That choice sets the guide rules and shapes the donor-free knockout workflow and clone screen that follow.
Run a donor-free knockout workflow and screen clones correctly
Run the donor-free workflow with edit traceability
Once the guide and nuclease are locked in, the next step is donor-free delivery and staged clone screening.
Before introducing any nuclease, authenticate the parental line. Record the species, tissue source, passage number, and karyotype or STR profile. That starting record gives you a clean reference point for everything that follows.
For delivery, RNP (ribonucleoprotein) complexes - preassembled Cas9 protein and sgRNA - are strongly preferred over plasmid or viral formats [2]. In plain terms, RNP delivery keeps the editor inside the cell for less time, which lowers the chance of low-frequency off-target cutting [2]. After transfection, give cells enough time to recover before any enrichment step. Enrichment may increase the fraction of edited cells in the pool, but it is optional and should be logged either way [1].
In a donor-free knockout workflow, all repair comes from end-joining. That matters because not every indel gives you a null allele. In-frame mutations - indels in exact multiples of three base pairs - can leave the reading frame intact and may preserve protein function [1]. So genotype screening needs to show a null allele and, where needed, biallelic loss, not just “an edit happened”.
The table below shows the records worth keeping at each step so the edit history stays traceable.
| Step | Required Records |
|---|---|
| Parental Authentication | Species, tissue source, passage number, karyotype/STR profile |
| Guide Design | gRNA ID, sequence and length |
| Delivery | Nuclease type, delivery format (RNP/plasmid), transfection parameters |
| Bulk Pool Screening | ICE/TIDE scores, percentage of frameshift indels |
| Clonal Isolation | Isolation method (FACS or limiting dilution), clone ID, plate map |
| Genotype Validation | Allele-specific sequencing, confirmation of biallelic loss |
| Functional Fit | Doubling time data, surface marker expression, suspension fitness |
Decide when bulk pools are useful and when clonal lines are needed
Bulk edited pools are useful when you need fast readouts. They work well for ranking guide RNA efficiency, running early growth comparisons across candidate targets, and doing high-throughput target validation without spending weeks on clonal isolation. In 2023, researchers at Ivy Farm Technologies used porcine myoblast pools transfected with Cas9 and sgRNA targeting the NF2 gene to assess knockout efficiencies at the pool level with Sanger sequencing and ICE analysis before moving on to clonal isolation [1].
But there’s a catch. End-joining gives you a mixed population: wild-type cells, heterozygous edits, frameshifts, and in-frame alleles all in the same pool. Any phenotype you measure is an average across that mixture, not a clean knockout readout. That is why a bulk pool cannot support a reliable knockout claim [1].
| Feature | Bulk Edited Pools | Single-Cell-Derived Clones |
|---|---|---|
| Speed | High (days) | Low (weeks to months) |
| Genotype Resolution | Low (population average) | High (defined alleles confirmed) |
| Clonal Variation | Masked by population average | Visible; allows selection of best-performing line |
| Screening Burden | Low | High |
| Suitability | Target discovery, guide ranking, early growth studies | Process development, protein-loss validation, regulatory release |
Move to single-cell cloning when process development needs a defined genotype. During clone outgrowth, expand under lineage-preserving conditions and keep tracking parental markers [1].
Screen genotype, protein loss and functional phenotype in stages
Screening works best as a staged workflow rather than one big pass.
- Stage 1 is the bulk pool locus check. PCR-amplify the target region and analyse it by Sanger sequencing with ICE decomposition. This gives you an overall editing efficiency score and an indel distribution, which is usually enough to decide whether clonal isolation is worth doing.
- Stage 2 resolves clone-level alleles. Once clones are isolated, amplicon sequencing (NGS) or allele-specific Sanger can show whether each clone carries biallelic loss or whether one allele escaped as an in-frame variant.
- Stage 3 checks protein loss. Genotype alone does not prove loss of function. A truncated protein can still keep some activity. Western blot or flow cytometry gives direct evidence of protein absence.
- Stage 4 tests the phenotype linked to the edit goal: doubling time, suspension adaptation, or the specific trait the knockout was meant to shift. This readout needs to stay stable across the pre-set passage window [1] [2].
The table below shows what each screening method can tell you - and what it cannot.
| Method | What It Establishes | Limitations |
|---|---|---|
| Sanger + ICE Analysis | Pool-level indel frequency and frameshift distribution | Cannot resolve specific allelic combinations in individual cells |
| Amplicon Sequencing (NGS) | High-resolution allele identity; off-target site detection | Higher cost; longer turnaround |
| Digital PCR (ddPCR) | Precise quantification of edit frequency or copy number | Requires specific probe design per target |
| Western Blot / Targeted Proteomics | Protein-level loss of the target | Semi-quantitative; requires validated antibody |
| Flow Cytometry | Surface or intracellular protein loss; lineage marker retention | Requires high-quality species-validated antibodies |
| Multi-Passage Growth Assay | Doubling time stability and production fitness | Time-consuming; minimum four passages for statistical validity |
For teams moving from the lab to production, understanding the costs of scaling cell lines in different bioreactor systems is a critical next step.
Always compare edited clonal lines against a matched parental-line Cas9-only, no-sgRNA control. That control helps separate edit-specific effects from transfection and culture stress before process-fit validation.
Validate the knockout for cultivated meat process fit and release
Validate across edit identity, molecular consequence, cell function and production fitness
Once clonal genotype and protein screens are done, the next step is release validation. At this stage, validate only the lines that already meet release criteria. The release package should cover four checks: edit identity, molecular consequence, cell function, and production fitness.
Edit identity is confirmed by PCR amplification of the target locus, followed by Sanger sequencing and ICE analysis. This shows whether the clone carries a frameshift or a biallelic knockout at the release stage [1].
Next, check protein loss and lineage retention by flow cytometry for CD29, CD56, and CD90. This confirms loss of the target protein and shows that the cell has kept its lineage identity through the editing workflow [1].
If those lineage markers are still present, move on to differentiation. Cell function validation uses BODIPY staining for adipogenic lines and myotube fusion index for myogenic lines [1].
Only after that should you test whether the line still performs under process conditions. Production fitness should be assessed in suspension culture. Triplicate Erlenmeyer flask growth curves run over at least four passages are useful here because they can reveal growth defects that show up later rather than immediately [1][2].
Measure the traits that matter using matched parental-line controls
Each assay in the validation framework should be run against a matched parental-line control, either wild-type cells or a Cas9-only, no-sgRNA pool. Without that reference point, it becomes hard to tell whether an observed change comes from the knockout itself or from editing-related stress.
Where the process calls for it, add stress and stability checks to the release package. Viability after high-shear or ammonia challenge can serve as a process-relevant readout. Genomic stability can be checked by karyotyping or by targeted NGS at predicted off-target sites.
Make a fit-for-purpose release decision
A clone should move forward only if it clears pre-defined thresholds across edit identity, molecular consequence, cell function, and production fitness, without harming identity, genomic stability, or process performance.
| Validation Tier | Evidence Type | Assay / Method | Control | Acceptance Criterion | Decision |
|---|---|---|---|---|---|
| Edit Identity | Allele characterisation | PCR + Sanger sequencing + ICE analysis | Parental wild-type | Frameshift or biallelic knockout confirmed | Go / No-go |
| Molecular Consequence | Protein loss; lineage retention | Flow cytometry (CD29, CD56, CD90) | Cas9-only pool | Target protein loss; lineage markers retained | Go / No-go |
| Cell Function | Differentiation potential | BODIPY staining or myotube fusion index | Matched parental line | Retained or enhanced differentiation potential | Go / No-go |
| Production Fitness | Suspension growth stability | Doubling time and viability across multiple passages | Parental control | Stable, reduced doubling time in suspension | Go / No-go |
| Process Stress Tolerance | Viability under stress | Viability assay after high-shear or ammonia challenge | Standard media control | High viability under process-relevant stress | Go / No-go |
| Genomic Stability | Off-target safety | Karyotyping or targeted NGS at predicted off-target sites | Parental wild-type | No unacceptable off-target mutations or translocations | Go / No-go |
CRISPR KO vs CRISPR KI experiment using CRISPR-Cas9
Conclusion: Connect Edit Success to Production Relevance
After validation, the last question is whether the edit improves production. In a cultivated meat programme, a gene knockout is only worth keeping if it delivers a measurable production benefit - not just a confirmed edit [1].
The NF2 case shows why genotype has to be checked alongside protein expression, lineage identity and growth data before a line is judged fit. That’s the difference between a characterised clone and a line that only has a genotyped edit.
Even then, process context can change the result. Test the clone in the same medium, culture format and cell density it will face in production, not just in discovery culture. That means checking performance across medium composition, suspension format and passage stability before any release decision is made.
Only clones that pass all four release tiers are ready for release.
FAQs
Why isn't genotype alone enough?
Genotype alone is not enough. In cultivated meat production, performance depends on the interplay between genetic potential, process conditions, and cell-state memory.
Gene editing can fix some hard limits, but it doesn't replace precise process control. Media can supply external cues, but those cues don't permanently set cell-state memory. And once the signals are removed, they can't stop transcriptional noise from creeping back in.
That’s why successful production depends on all three pieces working together: gene design, media optimisation, and bioreactor fit.
When should I use pools instead of clones?
Use pools in the early stages of gene knockout design and process development. They let you assess the overall effect of an edit faster across a mixed population, which helps with high-throughput screening and early validation.
Pools also cut the risk of bias or phenotypic drift that can show up when you rely on a single clone too soon.
How do I know a knockout is production-ready?
A knockout is production-ready when the edited cultivated meat cell line stays genetically and phenotypically stable across extended passaging, while consistently keeping high viability and myogenic function or proliferation.
It also needs to fit your process requirements. That can include suspension adaptation or shorter doubling times under serum-free conditions. Gene edits, media formulation, and bioreactor compatibility need to be tested as one system, not as separate parts.


