

If I were building a screening platform for cultivated meat cell lines, I’d start with one rule: pick one screening goal first, then build the workflow around it.
For bioprocess engineers, cell culture scientists, and cultivated meat R&D teams, the article’s main point is simple. A screening platform only works when the assay, plate format, delivery route, readouts, and go/no-go gates all match the production trait you want to change. If I mix growth, differentiation, and identity screening into one system without fixed rules, I get lots of data and weak decisions.
Here’s the full article in a few lines:
- I should define the target phenotype first, such as shorter doubling time, single-cell suspension growth, or retained differentiation potential.
- I should use growth or viability assays for first-pass triage, then check top hits with flow cytometry or high-content imaging.
- I should match plate format to cell behaviour and automation level: 96-well for assay set-up, 384-well for scaled screening, and 1,536-well only when single-cell suspension and tight automation are in place.
- I should match construct delivery to screen stage: transient for early testing, stable integration for line development, and pooled libraries for broad search campaigns.
- I should fix controls, normalisation, replication, and hit-calling rules before the screen starts, including Cas9-only controls for CRISPR work.
- I should rank hits by scale-fit, not just assay score: growth, suspension compatibility, phenotype stability, serum-free media fit, and clone traceability all matter.
One detail stands out: the article points to triplicates across at least four passages for doubling-time assessment, not a one-off plate read. That matters because many early hits fail once cells are pushed through more passages, suspension culture, or serum-free conditions.
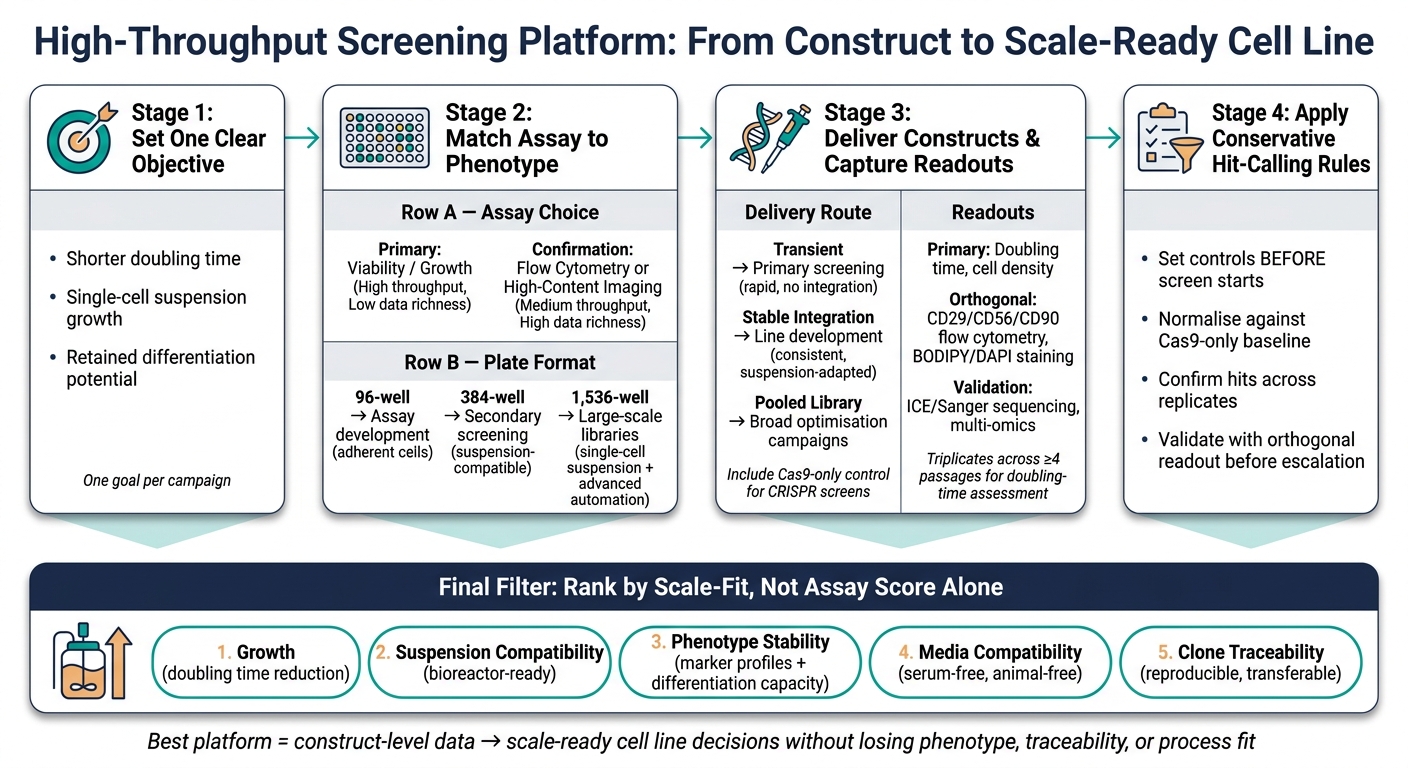
High-Throughput Cell Line Screening: 4-Stage Workflow for Cultivated Meat
Quick comparison
| Area | First choice | Follow-up choice | What I’m checking |
|---|---|---|---|
| Screening goal | Growth, suspension, or phenotype | Keep one main goal per campaign | Whether the platform answers one clear question |
| Assay | Viability / growth | Flow cytometry or imaging | Growth rate, identity, morphology |
| Plate format | 96- or 384-well | 1,536-well if suspension-ready | Throughput vs cell fitness |
| Delivery route | Transient transfection | Stable line or pooled library | Short-term effect vs long-term line performance |
| Readout | Doubling time, cell density | Marker panel, staining, sequencing | Whether the hit is real and stable |
| Selection gate | Assay score | Scale-fit filters | Whether the line can move into bioreactor work |
So if I had to sum up the article in one sentence, it would be this: the best high-throughput platform is the one that turns construct-level data into scale-ready cell line decisions without losing phenotype, traceability, or process fit.
1. Choose the right assay format for construct screening
Assay format determines plate density, automation demand, and how much phenotypic detail you can read out. In cultivated meat cell line design, that choice should track the production readout you care about most: growth, differentiation, or cell identity.
Growth and viability assays for primary screening
Use growth and viability assays for primary screening. They’re fast, easy to scale, and give you a direct read on proliferation - the trait that matters most at the first pass. In cultivated meat production, doubling time is a major bottleneck for economic viability, so ranking constructs by growth rate gives teams a clear first filter [2].
There’s a catch, though. A growth-only screen can miss constructs that preserve proliferation while hurting differentiation potential. So these assays work best as triage tools, not final qualification gates.
High-content imaging and flow cytometry for richer phenotypes
When construct libraries shift multi-parameter cell states - such as differentiation state, surface marker retention, or morphology - a single readout won’t tell you enough. Flow cytometry and high-content imaging help fill that gap because they can pick up the phenotypic detail that viability assays leave behind.
Ivy Farm Technologies showed this in work published in July 2024. They used flow cytometry and fluorescence microscopy to confirm that CRISPR-edited porcine and bovine myoblasts retained differentiation potential after NF2 knockout - the sort of result a growth-only screen could have missed completely [2]. That’s why primary hits need orthogonal confirmation.
High-content imaging is a strong fit for differentiation assays, where spatial patterning and morphology matter. The trade-off is throughput. Both imaging and flow cytometry are usually better for confirmation than for primary screening of large libraries.
Assay format comparison table
| Assay Format | Throughput | Data Richness | Best-Fit Use Case |
|---|---|---|---|
| Viability / Growth | High | Low | Primary screening for growth |
| Flow Cytometry | Medium–High | High (multi-parameter) | Cell identity and heterogeneity |
| High-Content Imaging | Medium | High (spatial, morphological) | Differentiation and morphology |
These assay choices shape plate density, liquid handling volumes, and the transfection workflow in the next stage.
A practical setup is a two-stage funnel:
- Growth or viability for primary screening
- Flow cytometry or imaging for confirmation
After assay selection, the next constraint is plate layout: how to distribute cells, reagents, and controls across the plate.
2. Design the plate format, liquid handling and transfection workflow
Plate density and control layout
For cultivated meat cell line design, the choice between 96-, 384- and 1,536-well plates should follow assay sensitivity, cell behaviour, throughput goals and the level of automation in place.
The 96-well format is usually the best fit for assay development, especially with adherent cell lines. The 384-well format cuts reagent use and fits suspension-compatible cultures running on standard automation. The 1,536-well format pushes throughput much further, but only if the cells can be handled as a single-cell suspension and the platform can support tighter automation control.
| Format | Reagent Use | Cell Behaviour | Automation Need | Primary Use |
|---|---|---|---|---|
| 96-well | High volume per well | Best for adherent cells | Manual or simple robotics | Assay development |
| 384-well | Reduced | Suspension-compatible cultures | Standard automation | Secondary screening / optimisation |
| 1,536-well | Minimal | Single-cell suspension required | Advanced automation | Large-scale library screening |
Higher-density plates are only useful when the cell line tolerates the growth state needed for construct screening. If the cells lose fitness, clump, or drift phenotypically under those conditions, the extra throughput won't help much.
Once plate geometry is fixed, liquid handling and the delivery route start to decide whether the screen will hold up at scale.
Liquid handling and low-volume automation
Microfluidics and automation can push screening from thousands of variants into the millions. Lower-volume dispensing cuts reagent waste and reduces well-to-well variation in construct screens. Low-dead-volume dispensers, paired with fixed tip-to-well geometry, also reduce volume error and help keep plate-to-plate data tighter.
That level of precision only pays off if the construct delivery route fits the screening stage.
Transient, stable and library delivery routes
Construct delivery should match the stage of the screen rather than being used the same way across the whole campaign. In practice, the three main routes - transient, stable and pooled library - line up with discovery, validation and broad optimisation.
Transient transfection is the right place to start for primary screening. It is fast, needs no selection window, and lets you measure construct activity within days. Ivy Farm Technologies uses transient transfection of Cas9 protein and sgRNA into porcine myoblast cell pools to evaluate NF2 knock-out efficiencies before long-term study [2]. The drawback is simple: transient expression fades, so it cannot show stable long-term performance.
Stable integration matters once you have candidates worth deeper characterisation. CRISPR-modified bovine cell lines now housed in the Tufts University open-access cell bank were adapted for single-cell suspension, which supports large-scale production research and bioreactor optimisation [6].
Pooled library delivery fits unbiased optimisation campaigns. Triplebar's partnership with Umami Bioworks used pooled screening to enrich higher-performing variants for cultivated Japanese eel production without genetic modification [1].
| Delivery Route | Best Use Case | Key Advantage |
|---|---|---|
| Transient | Primary screening / CRISPR delivery | Rapid results; no permanent integration risk [2] |
| Stable integration | Commercial production lines | Consistent performance; suspension adaptation [6] |
| Pooled library | Evolutionary optimisation | Screens the genome for broad improvements [1] |
Include a Cas9-only control to separate delivery effects from editing effects.
With plate format and delivery route set, the next step is to standardise readouts and hit-calling rules.
sbb-itb-ffee270
3. Select readouts, controls and analysis pipelines that produce reliable hits
Once the assay format and delivery route are fixed, the next job is to lock down the readouts, controls and hit-calling rules. If this part is loose, the screen can look busy without telling you much.
Primary and orthogonal readouts
Your first readout should be fast, high-throughput and closely linked to the phenotype you want to change. In growth and proliferation screens, doubling time and cell density are usually the most practical primary metrics. If a construct shifts doubling time in a material way, it tends to show up fast.
Primary readouts are for ranking. Orthogonal readouts are for checking whether that ranking holds up. Once a construct passes the first filter, use a second, independent measurement to confirm that the signal is real and that cell identity and phenotype have not drifted.
For differentiation screens, BODIPY and DAPI can confirm mature adipocytes by showing lipid droplets and peripheral nuclei [2]. For suspension adaptation, flow cytometry of markers such as CD29, CD56 and CD90 helps check that mesenchymal or myoblast identity is still there [2].
For later validation, multi-omics can support checks on stability, nutrient use and safety [4][5].
Controls, normalisation and hit calling
Set the controls before the screen begins. For CRISPR-based screens, use Cas9-only pools as the baseline for normalising CRISPR screens [2].
Replication also needs to be set up with care. Triplicates across at least four passages give you a much firmer view of doubling time than a short snapshot [2]. For genotypic confirmation of CRISPR edits, ICE analysis of Sanger sequencing data can be used to estimate knock-out efficiency [2].
Hit calling should stay conservative. Move forward only with candidates that agree across replicates, then check them with an orthogonal readout before pushing them towards scale-up. That extra gate can save a lot of time later.
Readout and analysis comparison table
| Readout | Primary or Orthogonal | Key Metrics | Data Burden | Common Artefacts | Best Fit |
|---|---|---|---|---|---|
| Doubling time | Primary | Growth rate, passage stability | Low | Environmental noise; batch effects | Fast ranking of proliferation hits |
| Flow cytometry | Orthogonal | CD29, CD56, CD90 surface markers | Medium | Antibody cross-reactivity; gating drift | Confirming phenotype after suspension adaptation [2] |
| BODIPY / DAPI staining | Orthogonal | Lipid accumulation; nuclear positioning | Medium | Destructive assay; imaging pipeline required | Differentiation confirmation in adipogenic lines [2] |
| Multi-omics | Orthogonal / Validation | Gene expression, metabolites, proteins | High | Complex data integration; high infrastructure demand | Stability, safety and validation [4][5] |
| ICE / Sanger sequencing | Validation | Knock-out efficiency (%) | Low | Mosaic editing; allele dropout | Genotypic confirmation of CRISPR edits [2] |
One support tool starting to show up here is digital twin modelling. Gourmey and DeepLife used it to triage candidates against an avian cell model trained on omics data [4], as Nicolas Morin-Forest, CEO, Gourmey, described:
"The digital twin is an AI-powered virtual replica of our cell cultivation process. We train the model using comprehensive 'omics' data... to identify the optimal feed formulations and bioreactor conditions." - Nicolas Morin-Forest, CEO, Gourmey [4]
Digital twin modelling does not replace wet-lab confirmation. What it can do is cut down the number of physical experiments needed before a candidate is escalated. The limit is pretty plain: a digital twin is only as good as the omics data used to train it. In practice, that means it belongs after primary screening has already produced candidates with solid empirical support. Use it to rank what to test next, then check whether those candidates stay stable and process-compatible at scale.
4. Apply selection criteria that link screening hits to scalable cultivated meat production
Once hits are called, rank them by scale-fit, not assay score alone.
Rank hits by stability, phenotype relevance and process compatibility
Use this order when ranking hits:
- Growth - Prioritise edits that shorten doubling time and support suspension growth; NF2 knockout is one example [2].
- Suspension compatibility - Advance only suspension-compatible hits. This is the key gate for bioreactor production [2].
- Phenotype stability - Confirm that surface-marker profiles stay stable and that adipogenic or myogenic differentiation capacity remains intact after adaptation [2]. Rapid maturation is a useful secondary filter, but only when phenotype stays stable.
- Media compatibility - Prefer lines that perform well in serum-free, animal-free media [2][7].
Then turn those rankings into pass/fail thresholds before moving candidates into validation. That step matters. A hit that looks strong in a screen can still fail later if it drifts in phenotype, struggles in suspension, or falls apart in serum-free conditions.
Define go/no-go criteria for R&D, process and QA teams
R&D, process development and QA should agree pass/fail thresholds before the screen starts. Use four gates:
- Growth - Advance hits that consistently reduce doubling time [2].
- Suspension compatibility - Exclude hits that cannot adapt to suspension growth [2].
- Phenotype stability - Confirm marker profiles and differentiation potential remain aligned with target cell identity after adaptation [2].
- Clone traceability - Prioritise single-cell clones so the top line can be reproduced, tracked and transferred into scale-up [7].
This keeps handoffs cleaner between teams. It also cuts a common problem in cultivated meat R&D: a line looks good in discovery work, then becomes hard to reproduce once process and QA step in.
Once the shortlist is fixed, source the same media, hardware and materials used in validation runs.
Sourcing and platform build-out with Cellbase
Use Cellbase to source verified bioreactors, growth media, scaffolds, sensors and cell lines with structured metadata for like-for-like comparison [3].
Conclusion: What a high-throughput screening platform must deliver
A high-throughput screening platform only matters if it is built around one clear cell line objective. That objective should shape the assay choice, plate design, delivery route, readouts, and selection rules. Those parts need to pull in the same direction, not work against each other.
Match the assay format to the phenotype you need to measure. High throughput sounds good on paper, but it only helps when the data are robust and biologically relevant.
Maintaining traceable construct-to-phenotype mapping across the full workflow is non-negotiable. Structured metadata and traceability need to be in place from the start. Every hit must stay linked to a defined construct, clone, and phenotype.
Analysis is part of the screen, not something you bolt on later. Set controls, normalisation, and hit-calling thresholds before the screen starts, then confirm primary hits with orthogonal readouts. Once hits are called, the last question is whether they can scale.
The final filter is scale-fit: suspension compatibility, phenotype stability, and traceability.
In cultivated meat cell line design, the best platform is the one that turns screening data into scalable, reproducible decisions.
FAQs
How do I choose the first screening goal?
Start by identifying the main bottleneck in your cultivated meat production process. Focus on the variable that has the biggest effect on scale-up and cost, such as cell doubling rate, proliferation efficiency, or culture media consumption.
Good starting metrics include cell yield, metabolic efficiency, and phenotypic stability. A reproducible baseline gives your team a consistent reference point, so you can compare experiments properly and generate data that holds up during downstream scale-up.
When should I move from transient to stable delivery?
Move from transient to stable delivery once you’ve identified a high-performing cell line and are preparing for scale-up.
Transient transfection works well in early R&D, where speed matters and teams are testing constructs, media conditions, or process ideas. It’s a good fit for fast iteration and short experimental cycles.
Stable delivery is the better choice when you need steady performance over time. That includes reliable self-renewal, fast doubling, and the consistency expected for regulatory approval and efficient manufacturing.
What makes a screening hit scale-ready?
A screening hit is scale-ready when the cell line already fits the core demands of industrial cultivated meat production. Above all, it should reach high cell density in single-cell suspension, which makes large-scale bioreactor operation much simpler.
Other signs matter too: strong self-renewal, short doubling times, tolerance of bioreactor conditions, and good metabolic efficiency in serum-free media. When a line is already well matched to at-scale processing, teams usually face less process development work during commercialisation.


