

If your harvested biomass is not defined, your downstream train is already off track. For cultivated meat teams, the core job is simple: recover whole cells, aggregates, or structured biomass with low damage, cut residual media, proteins, DNA, and debris to food-grade limits, and release only material that stays in spec from harvest to final hold.
I’d boil this checklist down to four pass gates:
- Set the product target first: whole cells, aggregates, and structured biomass do not tolerate the same shear or separation settings.
- Pick the least aggressive clarification step that still meets throughput: counterflow centrifugation, depth filtration, microfiltration/TFF, and high-speed centrifugation each trade off shear, footprint, cleaning load, and scale fit.
- Lock in measurable endpoints before the run: pH, conductivity, turbidity, total solids, yield, impurity markers, concentration factor, diafiltration volume, TMP, and flux.
- Do not treat cleaning and QC as end-stage paperwork: closed transfers, bioburden control points, CIP/SIP records, clean-water recovery checks, and stage-based analytics decide whether a batch moves forward or stops.
A few points stand out straight away:
- Food-grade output is the target, not biopharma-grade purity
- TMP and flux drift are early warning signs in membrane steps
- Sampling location matters as much as the limit itself
- Scale-up should wait until filter capacity stays steady run to run
Here’s the short version of the process flow I’d keep in view:
- Harvest and clarify without damaging biomass
- Check clarified stream quality before polishing or concentration
- Run concentration/UF/DF to fixed endpoints
- Control contamination and verify cleaning
- Release only if in-process and final QC all pass
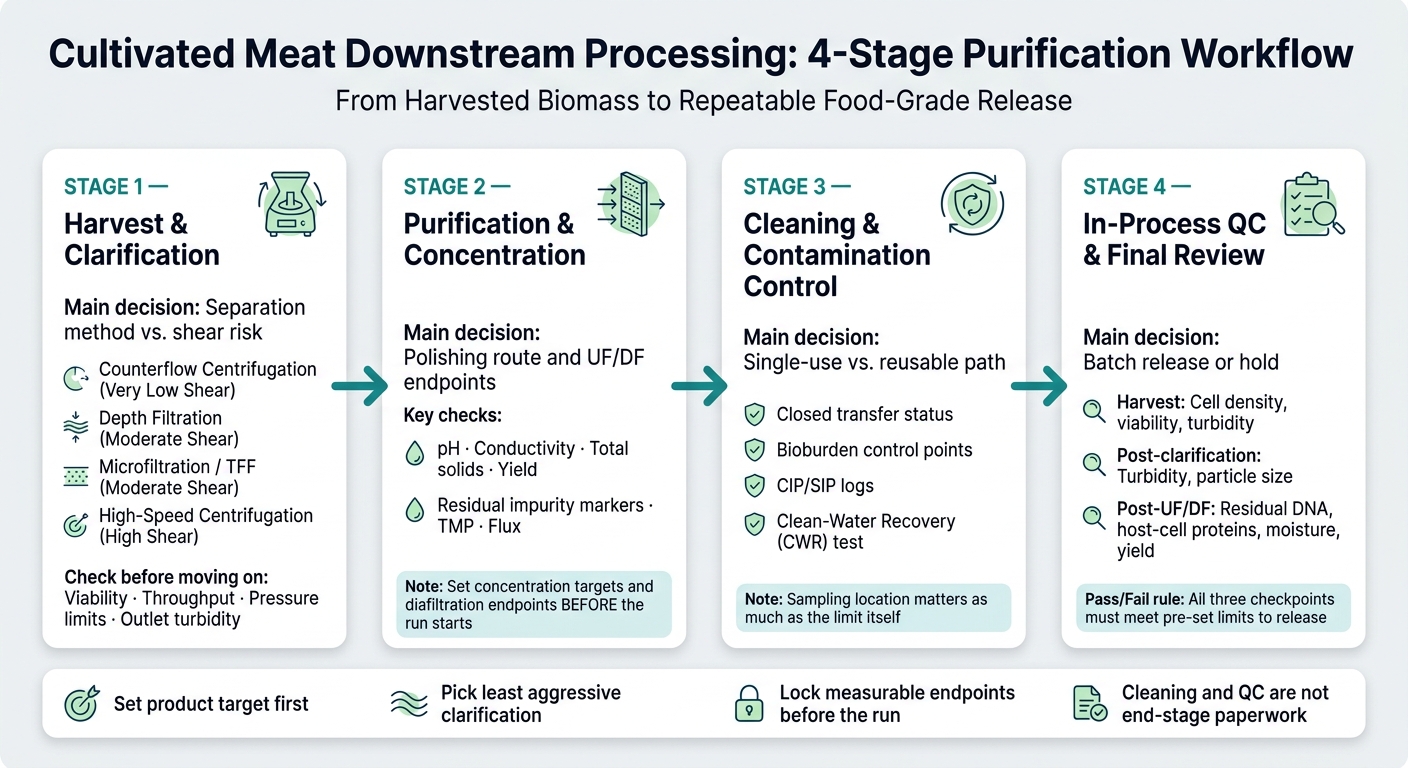
Cultivated Meat Downstream Processing: 4-Stage Purification Workflow
Quick comparison
| Stage | Main decision | What I’d check before moving on |
|---|---|---|
| Harvest & clarification | Separation method vs shear risk | Viability, throughput, pressure limits, outlet turbidity |
| Purification & concentration | Polishing route and UF/DF endpoints | pH, conductivity, solids, yield, impurity markers, TMP, flux |
| Cleaning & contamination control | Single-use vs reusable path | Closed transfer status, bioburden controls, CIP/SIP logs, CWR |
| In-process QC & final review | Batch release or hold | Turbidity, particle size, residual DNA, host-cell proteins, moisture, yield |
If you run downstream for cultivated meat, this is the checklist that keeps the line focused on one outcome: repeatable food-grade biomass with known release criteria, not just material that “looks clean”.
Checklist 1: Harvest and Clarification Readiness
Use clarification to remove cells, debris, and particulates without damaging the biomass. The goal is to keep biomass integrity intact while maintaining process flow at pilot or production scale, in line with the food-grade output goal set earlier.
Choosing a clarification method
Start with the harvested stream profile and the target biomass form. Then choose the least aggressive method that still delivers the throughput you need. The separation step should fit the stream properties, the scale of operation, and the downstream use.
The table below sets out the main options against the criteria that matter most at pilot and production scale:
| Method | Scale Fit | Shear Risk | Footprint | Cleaning Burden | Flexibility |
|---|---|---|---|---|---|
| Counterflow Centrifugation | High (pilot to production) | Very low (gentle) | Moderate | Low (if single-use) | High (automated) |
| Depth Filtration | High (modular/scalable) | Moderate | Low | Very low (disposable) | Moderate |
| Microfiltration (TFF) | High (scalable) | Moderate | Moderate | Moderate | High (concentration/diafiltration) |
| High-Speed Centrifugation | High (continuous units) | High | Large | High (unless single-use) | Low |
For shear-sensitive cultivated meat cells, counterflow centrifugation is a good fit because it gives gentle, automated processing [1]. Depth filtration works well for primary and secondary clarification, removing cell debris, host cell proteins, and DNA [5][1][6]. In high-density cultures with heavy solids loading, specialist depth filters can take that load and cut turbidity in a single step [5]. Tangential flow microfiltration is often used when the aim is to separate and concentrate proteins or biomass while keeping the feed stream clean [1][3]. Where possible, use single-use formats to reduce cleaning validation work and lower contamination risk.
Once the method is set, fix the operating setpoints and consumable specifications before start-up.
Equipment and setpoint checklist
Before processing starts, verify the following:
| Category | Verification Items |
|---|---|
| Operational parameters | Feed flow rate, g-force (centrifugation), TMP range (filtration) |
| Consumables | Membrane or filter grade (0.5 µm to 40 µm), filter lot documentation |
| System readiness | Hold-up volume, pressure monitoring, venting, priming, alarm functions |
| Containment and safety | CIP/SIP compatibility, containment controls, line clearance |
Pay close attention to venting and priming. If those steps are skipped or done poorly, air locks can form and part of the filtration area may sit unused. For membrane systems, track TMP and flux during the run. If performance starts to fall off, check feed composition and cleaning steps first [4].
Release criteria before a full run
Before a full run, confirm:
- incoming cell viability
- expected throughput in L/m²
- maximum differential pressure limit
- target outlet turbidity
- required documentation for filter lot numbers, membrane condition, line clearance, and any flocculant or pretreatment used [5][1][4]
Only proceed when the system is within the agreed start-up limits.
Checklist 2: Purification and Concentration Controls
With clarification done, the focus moves to the clarified stream. The job here is simple: confirm the material is still within specification before it goes into polishing or concentration. That protects food-grade consistency and gets the biomass ready for the next downstream step.
Characterising the Clarified Stream
After clarification, check that the stream is within spec before polishing or concentration. Treat the clarified stream profile as the baseline for downstream decisions.
Measure and record these critical quality attributes before moving on:
| Attribute | Check | Action if Out of Range |
|---|---|---|
| pH | Within validated range for next unit operation | Rework, reprocess, or divert |
| Conductivity | Within validated range | Rework, reprocess, or divert |
| Turbidity | Below maximum limit for polishing step | Rework, reprocess, or divert |
| Total solids | Within expected range for stream composition | Rework, reprocess, or divert |
| Yield | Above minimum acceptable recovery | Investigate before proceeding |
| Residual impurity markers | Below defined limits (e.g. host cell proteins, DNA, residual media components) | Hold; do not proceed to polishing |
If any attribute sits outside the agreed range, hold the material and make a rework, reprocess, or divert decision before anything else happens.
Impurity Reduction Methods
Use the measured stream profile to choose the next polishing step. Only use validated polishing steps that fit the next unit operation. The point is to reduce residual media components, soluble proteins, and other process-related impurities without damaging the biomass needed for formulation, structuring, or final blending.
Check the following before proceeding:
- Polishing method is validated for this process train
- The method is compatible with the next unit operation
- Impurity reduction targets are defined and measurable
- No step adds reagents or conditions that conflict with food-grade output
- Results are recorded and reviewed before release to the next stage
Concentration and Diafiltration Endpoints
Set concentration targets and diafiltration endpoints before the run starts. These endpoints keep the biomass within specification for the next process stage.
Confirm the following before and during the run:
- Target concentration factor is defined and documented
- Diafiltration volume and buffer composition are specified
- TMP and flux are monitored against validated limits throughout the run
- Permeate and retentate are sampled at defined intervals
- Endpoint criteria are confirmed (e.g. conductivity, volume reduction, impurity clearance)
- Do not release until the material meets predefined endpoint criteria
Lock these endpoints before moving to contamination control and final QC.
sbb-itb-ffee270
Checklist 3: Contamination Control, Cleaning and Validation
After concentration, the next focus is contamination control, cleaning, and recordkeeping. This part protects purified biomass from recontamination before final hold. It sits squarely between concentrated biomass and final release.
Bioburden and Contamination Control Points
Bioburden control is not just about setting a limit. Where you sample matters just as much. The table below shows the main control points across harvest, clarification, concentration, and buffer exchange.
| Process Stage | Primary Control Point | Recommended Approach |
|---|---|---|
| Cell Harvest | Environmental exposure and bioburden | Closed, automated centrifugation [1] |
| Clarification | Cellular debris and process impurities | Depth filtration followed by microfiltration [1] |
| Concentration (TFF) | Cross-contamination and bioburden | Single-use TFF cassettes or validated CIP cycles [2] |
| Sterile filtration | Microbial ingress | Sterilising-grade membrane filters [1] |
| Buffer Exchange | Chemical purity and bioburden | Validated buffer filtration with closed transfer [2] |
Keep the flow path closed at each stage. On single-use assemblies, check connectors carefully. On reusable lines, use documented closed-transfer procedures.
Around downstream skids, monitor particle counts, humidity, and pressure differential. For surface monitoring, use contact plates on flat areas and swabs on recessed or curved surfaces [4].
Cleaning and Sanitisation Verification
For reusable equipment such as TFF skids, chromatography columns, and hold vessels, CIP and SIP cycles need to be validated and logged before release. Cleaning chemistry must match the membrane material. If it does not, the membrane can be damaged or residues may remain behind [2].
After each cleaning cycle, run a clean-water recovery (CWR) test on membranes to confirm return to baseline permeability. If CWR stays low, that is a warning sign. The cleaning sequence or the operating window needs review [4]. Sample the relevant lines and record residue sampling results before the equipment is cleared for the next run.
Only release reusable equipment once verification is complete.
Validation Records and Deviation Handling
Each purification run needs a minimum documentation set. Batch records should capture process parameters, in-process results, and operator sign-off. Cleaning logs should record the CIP/SIP cycle, the agents used, and residue sampling results. Equipment status labels also need to stay current and visible: cleaned, in-use, or dirty.
Calibration certificates for critical sensors must be current before the run starts.
If you see fouling, a microbial limit exceedance, or out-of-spec yield or purity, record it in a deviation report with root cause and corrective action. Any unexpected TMP rise or flux drop should be investigated before batch release [4].
Use these records to support the in-process QC gate.
Checklist 4: In-Process Monitoring, QC and Final Review
Analytical Tests by Process Stage
Use stage-specific testing to spot drift before it hits yield or purity. Check at harvest, post-clarification and post-UF/DF. Don’t wait for a single end-of-process readout to tell you something went wrong. Set pre-defined acceptance criteria for each stage and use them consistently.
| Checkpoint | Key Analytical Tests | Purpose |
|---|---|---|
| Harvest | Cell density, viability, turbidity | Confirm culture health and set the clarification baseline |
| Post-clarification | Turbidity, particle size | Verify clarification before concentration |
| Post-UF/DF | Residual DNA, residual host-cell proteins, moisture, yield | Confirm purity and concentration before release |
Residual DNA and host-cell protein measurements should be assessed against the intended product specification.
Scale-Up and Procurement Review
After release checks, make sure the process is performing the same way from run to run before you increase throughput. Before scale-up, confirm that filter capacity stays stable across runs. If that trend shifts, stop and investigate before scale-up proceeds.
Also review the basics that can quietly derail a process if they’re missed:
- Supplier qualification
- Filter lot traceability
- Instrument calibration records
Core Pass/Fail Points for a Repeatable Purification Workflow
A batch should pass only when harvest, post-clarification and post-UF/DF results all meet pre-set limits. Hold or reject material when turbidity, particle size, residual DNA, residual host-cell proteins, moisture or yield fall outside spec. Approve scale-up only when run-to-run filter capacity remains stable.
These controls help keep release decisions repeatable.
FAQs
How do I choose the safest clarification method?
Choose the safest clarification method based on your process scale, the properties of the fluid stream, and the safety requirements of the step. Check that equipment such as centrifuges or filters can run safely at the target pressure and temperature, and that the process does not rely on hazardous or toxic chemicals that may put staff at risk.
You also need to confirm that the method protects product integrity, removes the right impurities, and allows for safe waste disposal in line with the required standards.
What should trigger a batch hold?
A batch hold should start as soon as any contaminant is found that could put product quality or safety at risk. That includes bacteria, fungi, mycoplasma, viruses, cross-cell line contamination, and endotoxins.
Early detection depends on close, real-time tracking of pH, dissolved oxygen, and turbidity, paired with molecular tests such as qPCR and ELISA.
When is a process ready to scale up?
A process is ready to scale up when you have an optimised, efficient, and reproducible workflow at laboratory scale that supports further development.
Before you move to larger volumes, purification results need to be consistent and economically viable. In most cases, that means running a pilot-scale stage to gather key physicochemical data for commercial-scale design, including fluid density, surface tension, and boiling points.


