

For cultivated meat R&D teams, I would approve pore analysis equipment only after testing a representative scaffold biomaterial against written acceptance criteria - not its advertised range alone.
The first check is whether the method measures what you need: micro-CT can assess 3D pore architecture where resolution and contrast permit; mercury intrusion measures accessible pore-entry sizes; liquid displacement measures bulk porosity; and conventional 2D microscopy examines surfaces or sections.
I would check six areas before ordering:
- Measurement fit: pore and throat sizes, connectivity, orientation, resolution and uncertainty.
- Sample handling: specimen dimensions, hydration control and preparation-related damage.
- Throughput: total time to reportable results, including preparation and analysis.
- Calibration and maintenance: traceability, repeatability, servicing and support.
- Software and quality records: raw data, analysis settings, exports, audit trails and qualification needs.
- Purchase approval: supplier checks, documented pass/fail results and named owners for unresolved gaps.
My rule: <u>do not approve equipment that fails a critical requirement</u>. A “GMP-ready” label is not a substitute for qualification and validation for your intended use.
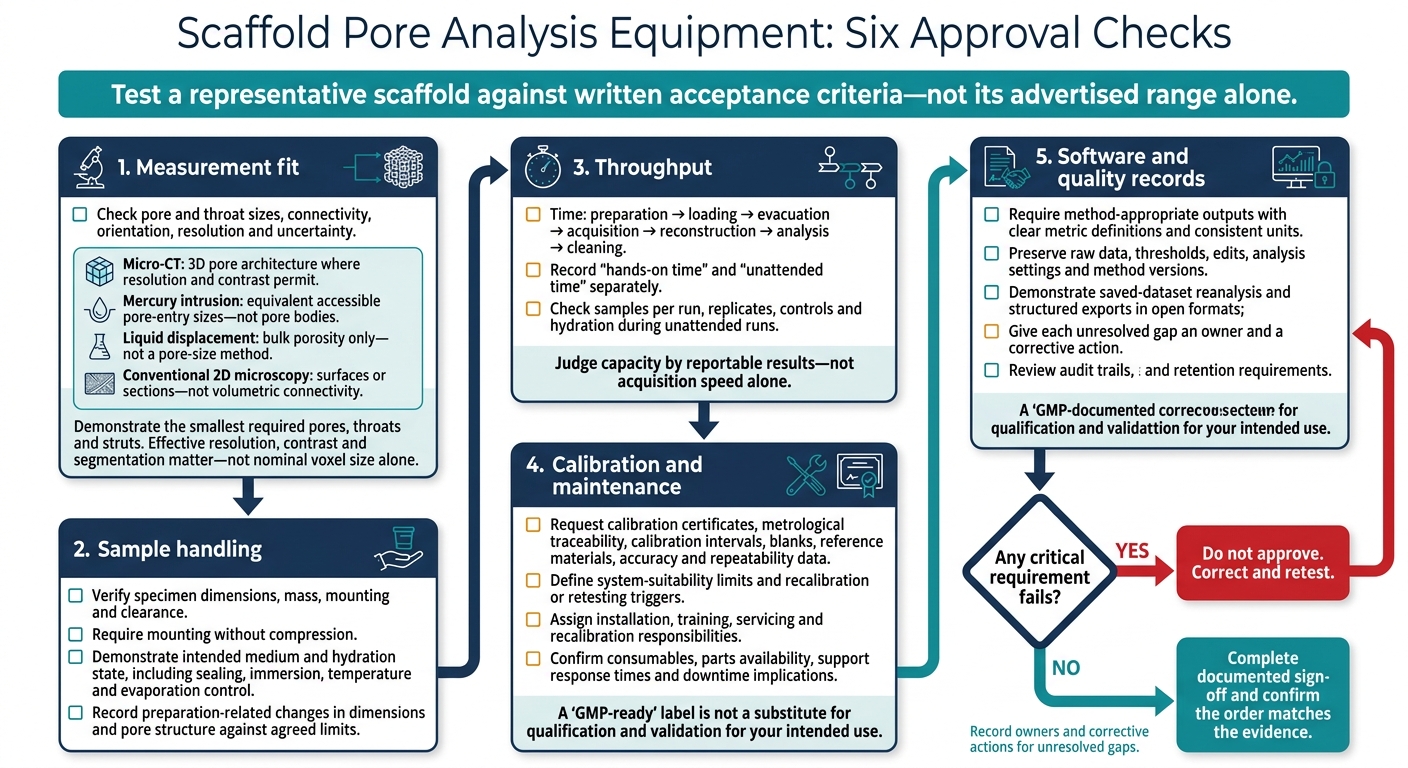
Scaffold Pore Analysis Equipment: Six Approval Checks
Basics of CTAn for porosity - MicroCT - part 1
sbb-itb-ffee270
2. Choose a Method That Measures What You Need
Compare what each method measures, not just its advertised range. Bulk porosity cannot replace pore-size distribution, and pore-entry size is not pore-body diameter.[1]
| Method | Pore-size range | Spatial resolution | Three-dimensional information | Pore accessibility | Sample impact | Limitations | Procurement use case |
|---|---|---|---|---|---|---|---|
| X-ray micro-CT | Instrument- and material-dependent; require a demonstrated range | Micrometre-scale; sub-micrometre capability depends on the system | Yes | Can distinguish open and closed pores where resolution permits | Mounting; contrast preparation may be needed; usually non-destructive | Contrast, effective resolution and segmentation limit results | Measure 3D pore architecture, throats and struts |
| Mercury intrusion porosimetry (MIP) | Require a demonstrated equivalent pore-entry range | Not applicable | No | Accessible pore entries only | Drying, degassing, mercury exposure and pressure; possible collapse | Wetting assumptions, deformation and large-pore limits | Measure entry-size distributions in rigid scaffolds |
| Liquid displacement or gravimetric analysis | Bulk porosity only; not a pore-size method | Not applicable | No | Accessible open pores | Saturation and weighing; non-destructive | Incomplete wetting | Screen bulk porosity only |
| Conventional 2D microscopy | Require a demonstrated range | Sub-micrometre to micrometre, depending on technique | No | Exposed surfaces or sections | Mounting; sectioning or coating may be needed; sectioning is often destructive | Sectioning bias; cannot establish volumetric connectivity | Inspect surface morphology and strut thickness |
Verify Image Resolution and 3D Measurements
Ask the supplier to demonstrate the smallest required pores, throats and struts in representative edible scaffolds. Base acceptance on effective resolution, contrast and segmentation - not nominal voxel size alone. Conventional 2D microscopy can check surfaces and sections, but cannot establish volumetric connectivity.[1]
Check Pore Accessibility and Measurement Limits
MIP measures equivalent accessible pore-entry sizes, not pore bodies. Request evidence that intrusion pressure does not deform the scaffold, and confirm the usable large-pore limit. Closed pores are inaccessible to intrusion. For liquid displacement, incomplete wetting can bias results.[1]
Use liquid displacement when bulk porosity alone meets the acceptance criteria. If both architecture and bulk porosity matter, require a validated combination of micro-CT and liquid displacement.[1] Once you have selected the method, check whether the instrument accommodates your sample size and wet-sample handling limits.
3. Check Sample Size and Wet-Sample Compatibility
Make sample compatibility a condition of approval: test a representative scaffold or biomaterial, not a substitute, against agreed limits for structural preservation.
Confirm Sample Dimensions, Mass and Mounting
Record specimen dimensions, mass, mounting requirements and clearance for irregular shapes. Require mounting without compression. For micro-CT, verify that the required resolution is maintained across the full scan volume, especially for whole-cut specimens. Use whole specimens when cutting would disrupt the structure.
Check Hydrated-Sample Handling
Require a demonstration using the intended medium and hydration state. Confirm sealing, immersion, temperature control and evaporation control.
Document Preparation and Sample Damage
Request a preparation record covering cutting, mounting, sterilisation and hydrolysis. Record changes in dimensions and pore structure against the agreed limits.
Use the approved handling setup as the baseline for throughput, calibration and maintenance checks.
4. Check Throughput, Calibration and Maintenance
Use the approved handling setup to check routine throughput, calibration and maintenance.
Measure Total Testing Time and Batch Capacity
Request a timed batch that covers preparation, loading, any evacuation step, acquisition, reconstruction, analysis and cleaning. Record hands-on and unattended time separately.
Confirm samples per run, sample IDs, saved methods and batch capacity, including replicates and controls. Check that hydration remains controlled during unattended runs. Judge capacity by reportable results, not acquisition speed alone.
Verify Calibration and Quality Controls
Request calibration certificates, metrological traceability, calibration intervals, blanks, reference materials, and accuracy and repeatability data across the full working range.
Define system-suitability limits and specify which failures trigger recalibration or retesting. Use these records to assess whether routine operation remains stable over time.
Define Installation and Maintenance Responsibilities
Obtain written site requirements for utilities and safety controls. Document preventive maintenance tasks, cleaning procedures and consumables.
Assign responsibility for installation, operator training, servicing and recalibration. Confirm parts availability and support response times. Specify which faults operators can resolve and which need a service visit, so batch capacity accounts for downtime.
5. Review Software Outputs and GMP Support
Once the instrument and handling setup are approved, review how the software stores, exports, traces and protects results before approving the purchase.
Specify Data Outputs and Traceability
Request only outputs the method can generate. Specify pore-size distributions, porosity and connectivity metrics, with clear metric definitions and consistent units for batch comparisons.
Ask the supplier to demonstrate reanalysis of a saved dataset using retained settings. Preserve raw data, thresholds, edits and method versions. Require structured exports in open formats so the data can be reused; PDF reports alone are not enough.[2][3]
Check these records against your documentation and data-integrity requirements.
Check Qualification and Data-Integrity Records
Have the quality team define the documentation needed for the intended use before accepting “GMP-ready” claims. Treat these as documentation claims only, and require user-led qualification and validation.
Base documentation requirements for software version control and data integrity on current regulatory requirements.[4] Review audit trails and controlled access. Ask how changes to analysis settings are logged and how earlier results remain retrievable.
Agree backup, restoration and retention requirements with the quality team. Request evidence that raw data, settings and linked records can be restored from backup.
6. Complete the Equipment Approval Checklist
Once technical fit, handling and software checks are complete, move to formal approval.
Record Acceptance Results and Unresolved Gaps
Hold a documented go/no-go review against the agreed criteria, with sign-off from technical, quality and procurement teams. Record the range, resolution, uncertainty, sample limits, wet-sample compatibility, throughput, calibration evidence, software outputs, GMP records, and owners for installation and maintenance.[2]
Attach representative-sample results, repeatability data and pass/fail criteria. Give each unresolved gap an owner and a corrective action. Do not approve equipment if any critical requirement fails; retest after correction.
Use this review to close internal gaps, then verify with the supplier that the proposed order matches the evidence.
Verify Supplier Claims Before Ordering
Use Cellbase as an initial source of supplier information. Before approving the order, confirm instrument capabilities and sensor selection, documentation and support commitments directly with the supplier against the documented acceptance criteria.[2]
FAQs
How do I set scaffold-specific acceptance criteria?
Set physical, chemical and biological benchmarks that match your process requirements. Include biocompatibility, biodegradability, edibility, and the ability to support cell adhesion and proliferation.
Specify strength, elasticity, pore size, architecture and surface-to-volume ratio. These structural parameters affect nutrient diffusion and bioreactor efficiency.
Cellbase’s curated resources can help you source verified materials or analytical tools to validate these criteria.
How can I compare results from different porosity methods?
Supplier formats and technical documentation vary, making equipment comparisons difficult. For a like-for-like comparison, look for structured metadata that standardises key performance indicators, such as pore size ranges and spatial resolution. Check that measurements use standardised metric units.
Cellbase converts information from supplier manuals into structured, comparable data. This makes equipment performance easier to assess without relying on fragmented or non-standardised specifications.
When should I revalidate my pore analysis method?
Revalidate your pore analysis method whenever you change scaffold materials, fabrication parameters or cell lines used in cultivated meat production enough to affect method performance. Changes to porogen size, extrusion settings or 3D printing parameters also require revalidation because they directly affect porosity.
Switching instruments or updating software also requires revalidation to maintain accurate, consistent data for reliable process characterisation. For equipment guidance and resources, browse the curated marketplace at Cellbase.


